# ansible-shell-script
**Repository Path**: yechen/ansible-shell-script
## Basic Information
- **Project Name**: ansible-shell-script
- **Description**: No description available
- **Primary Language**: Unknown
- **License**: AGPL-3.0
- **Default Branch**: master
- **Homepage**: None
- **GVP Project**: No
## Statistics
- **Stars**: 0
- **Forks**: 0
- **Created**: 2021-12-29
- **Last Updated**: 2021-12-29
## Categories & Tags
**Categories**: Uncategorized
**Tags**: None
## README
# ansible-shell-script
通过窗口一键初始化/还原操作系统环境基本配置和中间件,选择性初始化/还原操作系统环境基本配置和中间件。
可根据现有目录结构定制自己的脚本。
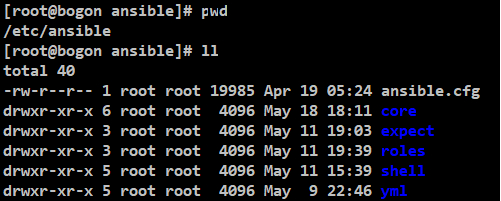
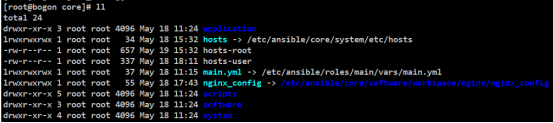
\# 在“/etc/ansible/core”目录中不包括软链接”main.yml”和”nginx_config”,需要根据”core(核心配置)”章节中的内容查看。
## 总体概览
\#务必保证所有机器中已安装
yum install -y ansible(执行 ansible 的本地服务器中安装即可)
yum install -y expect
yum install -y libselinux-python
且所有 root 密码必须保持一致,对外开放 22 端口,root 能远程登录。
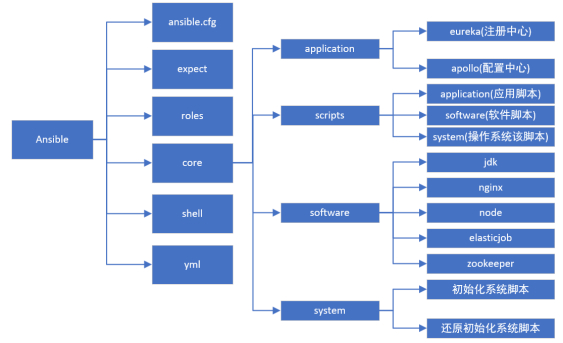
## 图形结构关系
## 目录结构
### ansible.cfg(略)
可查看 ansible 相关书籍
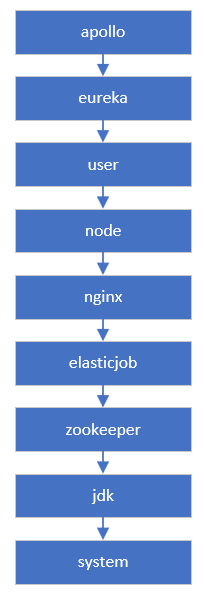
### core(核心配置)
#### 图形结构
#### 图形化配置步骤
#### 配置规则及信息
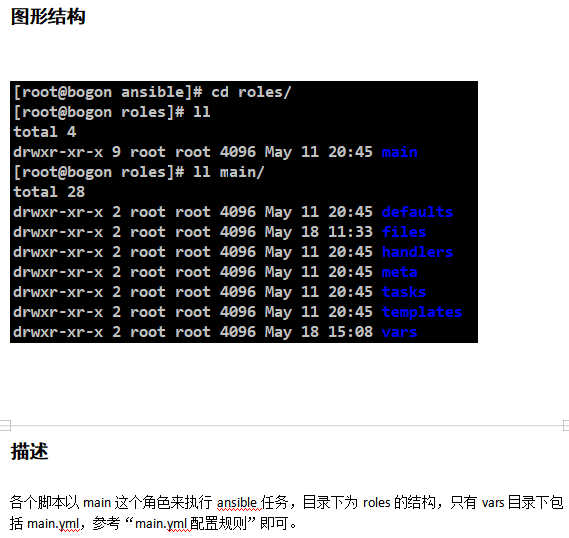
core 这个目录里是配置文件、安装应用和安装软件的统一目录。
分为几大部分:
application 为远程安装应用软件的目录。
scripts 为远程运行的脚本目录。
software 为远程安装中间件的目录。
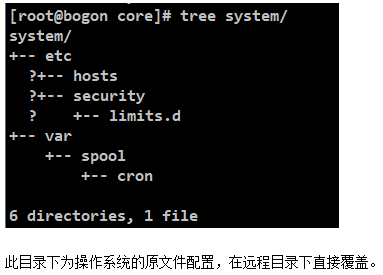
system 为远程覆盖系统文件的目录。
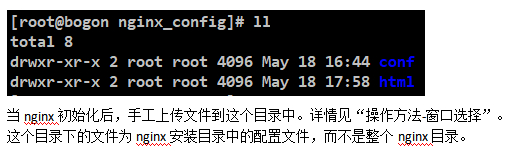
nginx_config 对应自定义 nginx 文件的配置。
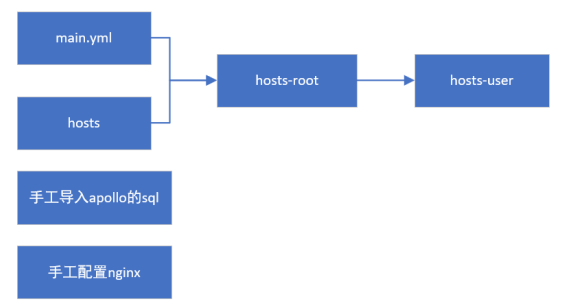
main.yml 对应 roles 中 main 角色权限的核心配置。
hosts 对应/etc/hosts。
hosts-root 对应 ansible 以 root 用户执行远程命令的配置。
hosts-user 对应 ansible 以普通用户执行远程命令的配置。
main.yml、hosts、hosts-root、hosts-user 是互相关联的。
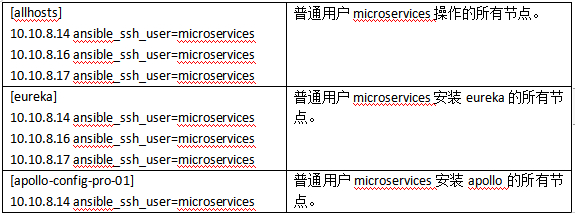
##### application 配置规则

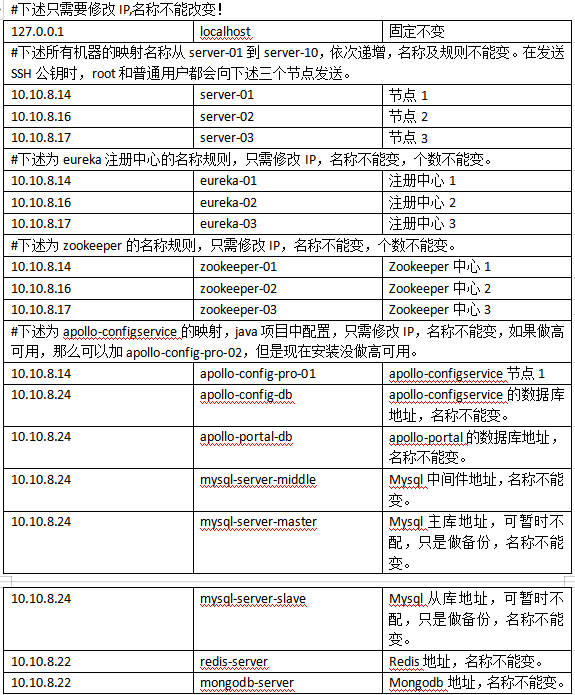
eureka-server-0.0.1-jar.tar.gz 是基于 Java 开发的 eureka 应用,版本是 2.0.0,是 eureka 的 server 端,包括三个节点,分别为 eureka-01:9000,eureka-02:9000,eureka-03:9000,需部署到三个不同节点中。
apollo1.3.0.tar.gz 为 apollo1.3.0 的压缩包,其中包括了 apollo-configservice,apollo-adminservice,apollo-portal,注册中心为 eureka-01:9000,eureka-02:9000,eureka-03:9000。启动 apollo 的前提条件是 eureka 已经启动,且 MySQL 中初始化了 apollo 相关的数据库,数据库可下载“https://github.com/ctripcorp/apollo/”获取。
apollo-configservice 端口 8080,仅仅是后台进程,对应 MySQL 库为 apollo-config-db,用户名密码为:apollo/apollo@db。
apollo-adminservice 端口 8090,仅仅是后台进程,对应 MySQL 库为 apollo-config-db,用户名密码为:apollo/apollo@db。
apollo-portal 端口 8070,对应 MySQL 库为 apollo-portal-db,用户名密码为:apollo/apollo@db。可以通过 URL 访问 apollo 控制台,用户名 apollo,密码 apollo@admin。
##### scripts 配置规则

##### software 配置规则

elastic-job-lite-console 为 elastic-job-lite-console 的控制台,起来之后需要手工配置 zookeeper 和 name。端口为 8899。用户密码分别为 root/admin@job 或 guest/guest@job。
nginx-1.10.2.tar.gz 为 nginx 的原始安装包,只是做了一个备份。无其他作用。
nginx_workspace_v1.10.2.tar.gz 为 nginx-1.10.2.tar.gz 编译后真正使用的安装包,不用编译,直接使用。
nginx-config.tar.gz 见”nginx_config 配置规则”。
node-v6.14.2.tar.gz 为 node 的原始安装包,只是做了一个备份。无其他作用。
node_workspace-v6.14.2.tar.gz 为 node-v6.14.2.tar.gz 编译后真正使用的安装包,不用编译,直接使用。
zookeeper-01 中的 zookeeper-3.4.11.tar.gz 为 zookeeper-01 节点的安装包。
zookeeper-02 中的 zookeeper-3.4.11.tar.gz 为 zookeeper-02 节点的安装包。
zookeeper-03 中的 zookeeper-3.4.11.tar.gz 为 zookeeper-03 节点的安装包。
##### system 配置规则
##### main.yml 配置规则
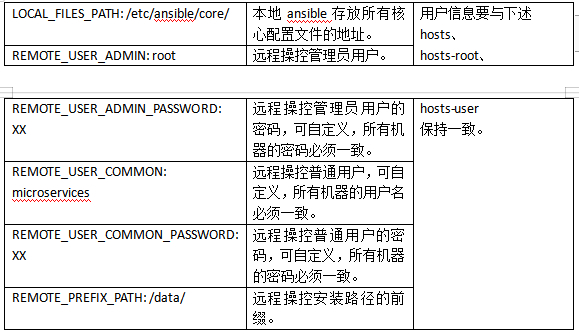
##### hosts(/etc/hosts)配置规则
##### hosts-root 配置规则
##### hosts-user 配置规则
##### nginx_config 配置规则
##### apollo 配置规则
参考“application 配置规则”中的 apollo 内容。
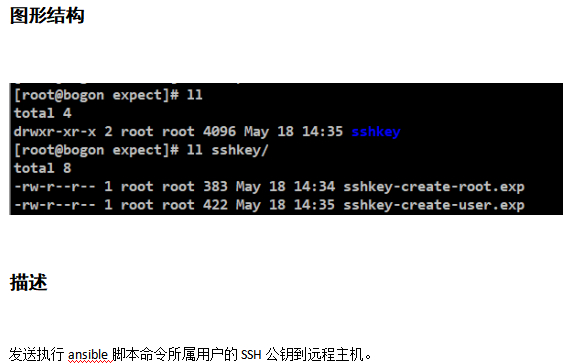
### expect(expect 发送批量 SSH)
### roles(权限)
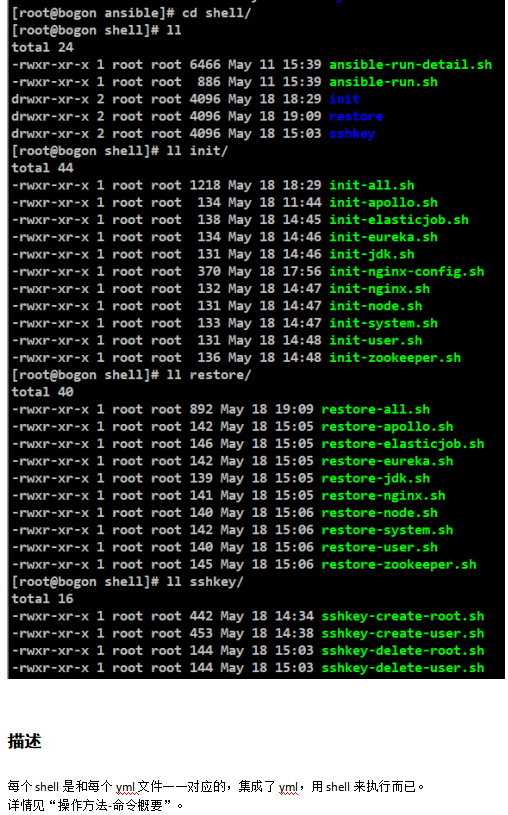
### shell(shell 脚本)
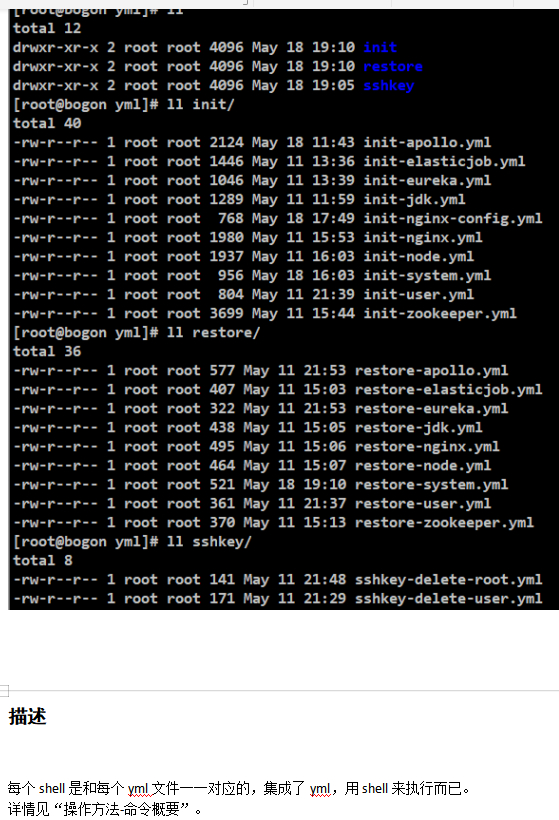
### yml(yml 脚本)
# 操作方法
### 窗口选择
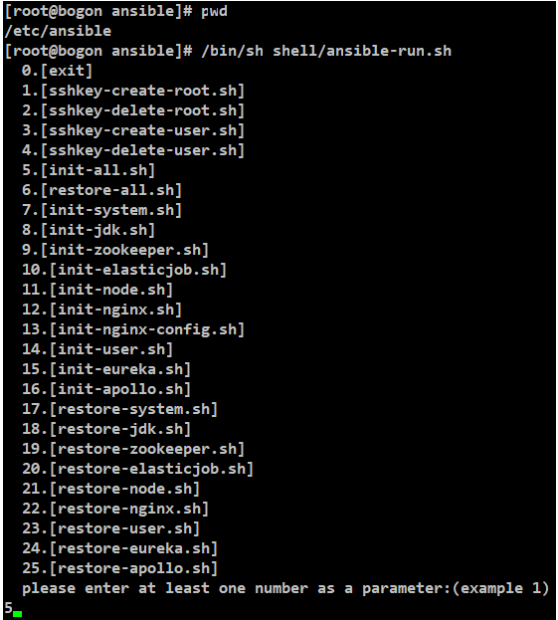
### 命令概要
0.[exit]
\#直接退出
1.[sshkey-create-root.sh]
\#生成 root 的 SSH 密钥
2.[sshkey-delete-root.sh]
\#删除 root 的 SSH 密钥
3.[sshkey-create-user.sh]
\#生成普通用户的 SSH 密钥
4.[sshkey-delete-user.sh]
\#删除普通用户的 SSH 密钥
5.[init-all.sh]
\#一键初始化所有用户、软件、系统信息
6.[restore-all.sh]
\#一键卸载所有用户、软件、系统信息
7.[init-system.sh]
\#只初始化系统信息
8.[init-jdk.sh]
\#只安装 JDK
9.[init-zookeeper.sh]
\#只安装 zookeeper
10.[init-elasticjob.sh]
\#只安装 elasticjob
11.[init-node.sh]
\#只安装 node
12.[init-nginx.sh]
\#只安装 nginx(无任何配置)
13.[init-nginx-config.sh]
\#安装完 nginx 后,手工设置 nginx 配置后执行
14.[init-user.sh]
\#只创建用户
15.[init-eureka.sh]
\#只安装 eureka
16.[init-apollo.sh]
\#只安装 apollo(初始化 apollo 的 SQL 后手工选择执行)
17.[restore-system.sh]
\#只清除操作信息
18.[restore-jdk.sh]
\#只卸载 JDK
19.[restore-zookeeper.sh]
\#只卸载 zookeeper
20.[restore-elasticjob.sh]
\#只卸载 elasticjob
21.[restore-node.sh]
\#只卸载 node
22.[restore-nginx.sh]
\#只卸载 nginx
23.[restore-user.sh]
\#只删除普通用户(前提无用户进程)
24.[restore-eureka.sh]
\#只卸载 eureka
25.[restore-apollo.sh]
\#只卸载 apollo
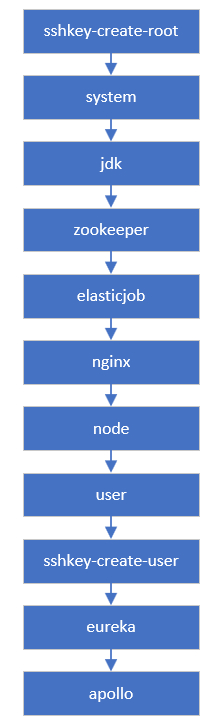
### 设计理念
#### 图形结构
##### 总体

##### 一键安装
从上到下依次执行
##### 一键还原
从上到下依次执行
##### 迭代过程
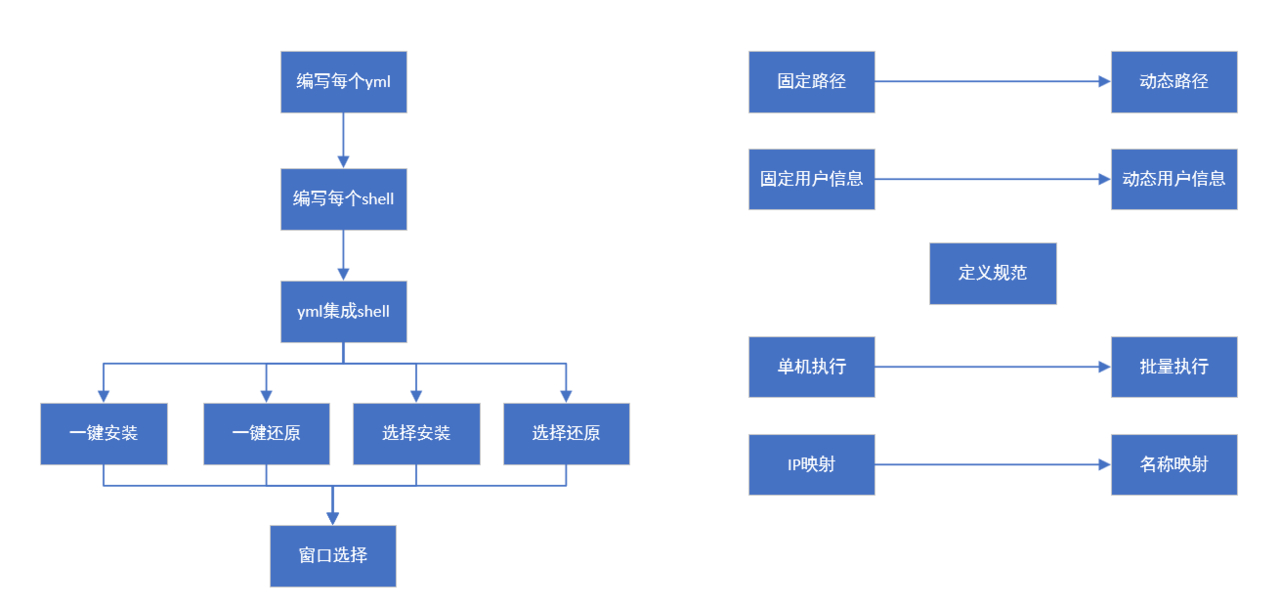
### 考虑过的问题
用户易操作性。
可批量安装和还原。
可选择性安装和还原。
配置文件统一位置统一修改。
脚本分块开发、分块存放。
弥补 ansible 命令不方便执行,集成到 shell 中。
部分并行执行,部分串行执行。
管理员 root 用户的配置要和普通用户的配置分隔开。
创建删除用户不要跟操作系统初始化和还原脚本放在一起,中间发生错误会断掉跟其他脚本的衔接。
一键安装脚本和一键还原脚本中要集成 yml 文件,而不是所有的 shell 文件,这样在一键脚本和选择脚本中修改内容不会互相有问题。
不要在 yml 文件中切换用户,会引起多次切换问题。
zookeeper 集群要一个个安装,因为配置文件中会指定数字,而 eureka 这类的可以并行安装,但是远程执行二者脚本前一定要加/usr/bin/nohup。
nginx、node 这些软件都是编译后打包的,因为编译时间特别长,所以直接打包编译后的文件即可,eureka、job、zookeeper 等同理。
### 遇见的问题
------
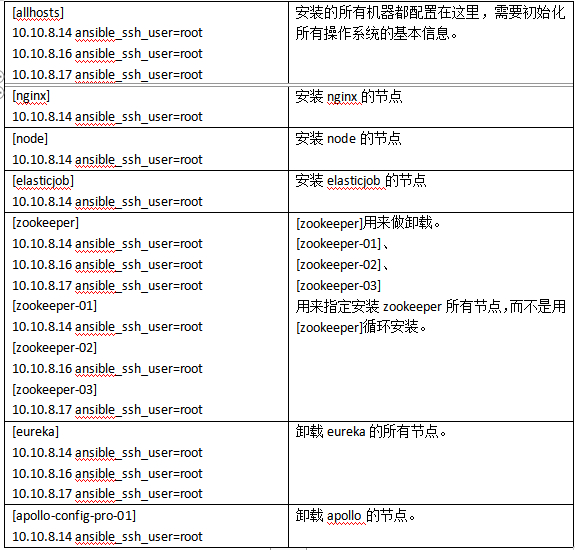
[root@bogon exp]# ansible Tomcat -m command -a "uptime"
10.10.8.16 | UNREACHABLE! => {
"changed": false,
"msg": "Failed to connect to the host via ssh: Permission denied (publickey,gssapi-keyex,gssapi-with-mic,password).",
"unreachable": true
}
10.10.8.17 | UNREACHABLE! => {
"changed": false,
"msg": "Failed to connect to the host via ssh: Permission denied (publickey,gssapi-keyex,gssapi-with-mic,password).",
"unreachable": true
}
\#上述失败,加入 ansible_ssh_user=tomcat 即可解决。记得 root 用户也要加。
[root@bogon ansible]# cat /etc/ansible/hosts
[root]
39.98.43.174 ansible_ssh_user=root
[tomcat]
10.10.8.16 ansible_ssh_user=tomcat
------
[root@bogon ansible]# cat yml/init02.yml
- hosts: nginx
remote_user: Tomcat
roles:
- testrole
tasks:
- name: rpm aliyun
shell: rpm -ivhhttp://mirrors.aliyun.com/epel/epel-release-latest-7.noarch.rpm
[root@bogon ansible]# ansible-playbook -i hosts yml/init02.yml -become=true
fatal: [10.10.8.14]: FAILED! => {"changed": true, "cmd": "rpm -ivh http://mirrors.aliyun.com/epel/epel-release-latest-7.noarch.rpm > /dev/null", "delta": "0:00:00.151553", "end": "2020-04-30 20:13:30.716755", "msg": "non-zero return code", "rc": 1, "start": "2020-04-30 20:13:30.565202", "stderr": "\tfile /etc/yum.repos.d/epel-testing.repo from install of epel-release-7-12.noarch conflicts with file from package epel-release-7-11.noarch\n\tfile /etc/yum.repos.d/epel.repo from install of epel-release-7-12.noarch conflicts with file from package epel-release-7-11.noarch", "stderr_lines": ["\tfile /etc/yum.repos.d/epel-testing.repo from install of epel-release-7-12.noarch conflicts with file from package epel-release-7-11.noarch", "\tfile /etc/yum.repos.d/epel.repo from install of epel-release-7-12.noarch conflicts with file from package epel-release-7-11.noarch"], "stdout": "", "stdout_lines": []}
to retry, use: --limit @/etc/ansible/yml/init02.retry
\#把 rpm -ivh 的命令放到 shell 文件中执行。
------
\#当某个 yml 文件执行失败后,会生成。retry 文件,记得删除掉。
------
\#还原任何内容记得用 root 用户执行而不是普通用户,以防普通用户已被删除的情况。
\#用某个用户还原时,如果远程操作系统有所属用户的进程,那么通过 ansible 执行会是失败的。
------
删除要写 rm -rf /data/application/{project,logs}/eureka-server/*
而不是 rm -rf /data/application/{project,logs}/eureka-server/ 这样会把最后的目录给干掉。
------
压缩包解压的文件,在发送到远程机器中,一定要解压后重新设定一下所属用户和用户组。
------
可以多个 shell 写在同一个 name 下。
- hosts: apollo-config-pro-01
remote_user: "{{ REMOTE_USER_COMMON }}"
roles:
- main
tasks:
- name: kill apollo-portal port
shell: ps -ef|grep "server.port=8070"|grep -v grep|awk -F " " '{print $2}'|xargs -r kill
shell: ps -ef|grep "server.port=8090"|grep -v grep|awk -F " " '{print $2}'|xargs -r kill
------
删除~/.ssh/*文件的同时,连接其实自动断开了,但是在远程操作系统中的命令会一直执行下去。
------
在新增或删除用户时,可能由于上次的不当操作,并没有执行成功,可加入“ignore_errors: yes”,忽略错误,继续执行其他脚本。
- hosts: allhosts
remote_user: "{{ REMOTE_USER_ADMIN }}"
roles:
- main
tasks:
- name: delete user-1
shell: "rm -rf /home/{{ REMOTE_USER_COMMON }} && userdel {{ REMOTE_USER_COMMON }}"
ignore_errors: yes
------
在执行命令执行时间过长或者集群安装时,要在执行前加入"/usr/bin/nohup”,后面加入”&”,
比如
"/usr/bin/nohup /bin/sh {{ REMOTE_PREFIX_PATH }}backup/scripts/system/init-system-1.sh {{ REMOTE_PREFIX_PATH }} > /dev/null 2>&1 &"
如果此时的处理并不影响下述其他命令执行,可在最后加入”&”
------
动态接收参数执行的命令,要把所有命令包在同一个引号里,而不能变量单独处理,比如
shell: "cd {{ REMOTE_PREFIX_PATH }}software/install/zookeeper/log && /bin/sh {{ REMOTE_PREFIX_PATH }}software/install/zookeeper/bin/zkServer.sh start"
------
删除用户彻底要把/etc/passwd 和/etc/group 的也删掉,执行
sed -i.ori '/^XX.*/d' /etc/group
sed -i.ori '/^XX.*/d' /etc/passwd
即可。
------
### 待优化内容
------
项目中指定的日志输出目录是/data/application/logs/xx。
那么 main.yml 中指定的远程安装前缀目录并不能修改这个/data。
------
zookeeper 安装是一个个节点顺序安装的,并不能并行安装,并行安装不能正常启动集群。
------
每个安装软件或应用,可单独把要更改的配置文件抽出来做一个模板,可动态配置参数来指定每个软件或应用的基本信息。
------
Apollo 中的 SQL 如果是多次使用的,可以导出来一份做模板,每次接入新系统来进行全局替换即可。
------
如果指定机器中运行了其他应用或软件,可加入批量 kill 端口的脚本。
------
所有动态生成的用户和密码,所有机器都必须是相同的,这个可以循环处理。
------
为了减少 yml 文件中的内容,可把 yml 中的部分内容都写到 shell 文件中,这样会更加清晰,也比 yml 中配置简单的多。
参考地址:https://blog.llyweb.com/articles/2020/05/19/1589894764371.html
源码地址:https://gitee.com/yechen/ansible-shell-script