# rabbitmq
**Repository Path**: vdgjj/rabbitmq
## Basic Information
- **Project Name**: rabbitmq
- **Description**: rabbitmq学习示例代码,笔记,以及安装过程中的docker-compose文件、集群负载均衡的nginx配置文件等
- **Primary Language**: Unknown
- **License**: Apache-2.0
- **Default Branch**: master
- **Homepage**: None
- **GVP Project**: No
## Statistics
- **Stars**: 0
- **Forks**: 1
- **Created**: 2025-03-13
- **Last Updated**: 2025-03-13
## Categories & Tags
**Categories**: Uncategorized
**Tags**: None
## README
# RabbitMQ
### 一、RabbitMQ介绍
#### 1.1 现存问题
- 服务调用:两个服务调用时,我们可以通过传统的HTTP方式,让服务A直接去调用服务B的接口,但是这种方式是同步的方式,虽然可以采用SpringBoot提供的@Async注解实现异步调用,但是这种方式无法确保请求一定回访问到服务B的接口。[那如何保证服务A的请求信息一定能送达到服务B去完成一些业务操作呢?]()| 如何实现异步调用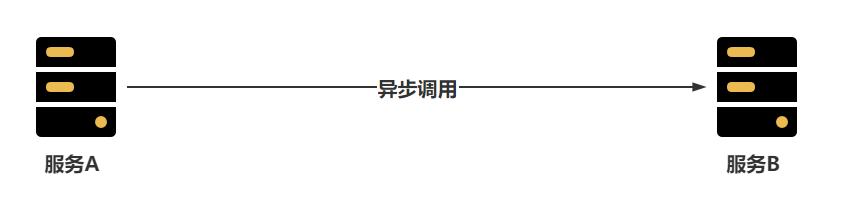
- 海量请求:在我们在做一些秒杀业务时,可能会在某个时间点突然出现大量的并发请求,这可能已经远远超过服务器的并发瓶颈,这时我们需要做一些削峰的操作,也就是将大量的请求缓冲到一个队列中,然后慢慢的消费掉。[如何提供一个可以存储千万级别请求的队列呢?]()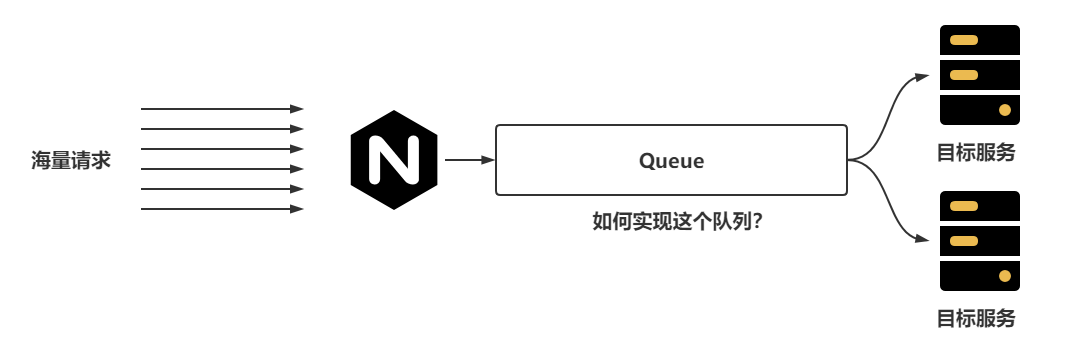
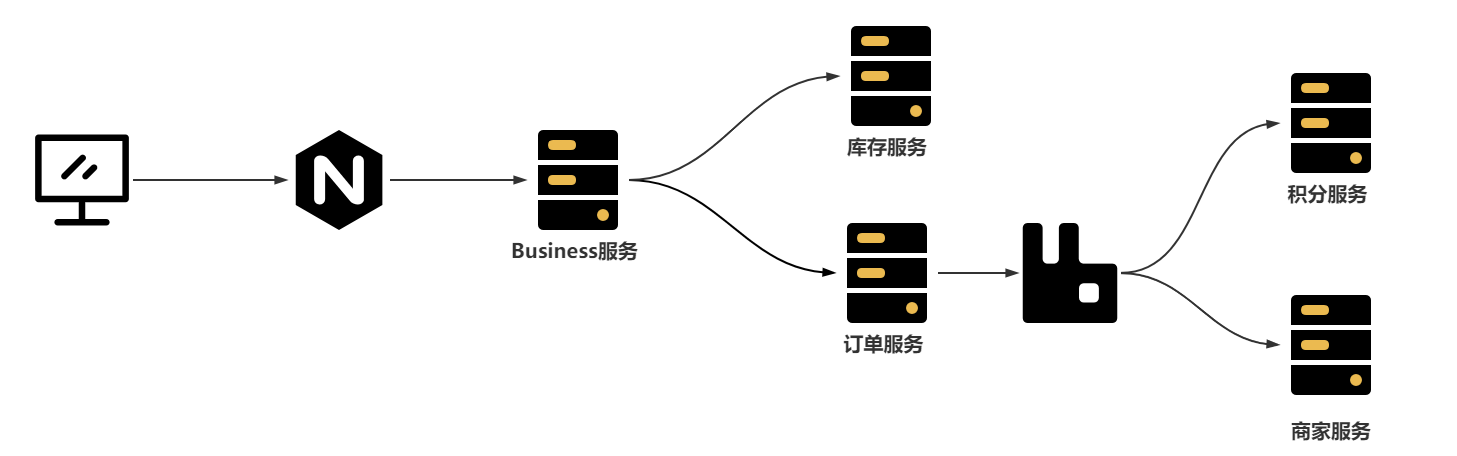
- 在微服务架构下,可能一个业务会出现同时调用多个其他服务的场景,而且这些服务之间一般会用到Feign的方式进行轻量级的通讯,如果存在一个业务,用户创建订单成功后,还需要去给用户添加积分、通知商家、通知物流系统、扣减商品库存,而在执行这个操作时,如果任意一个服务出现了问题,都会导致整体的下单业务失败,并且会导致给用户反馈的时间延长。这时就造成了服务之间存在一个较高的耦合性的问题。[如何可以降低服务之间的耦合性呢?]()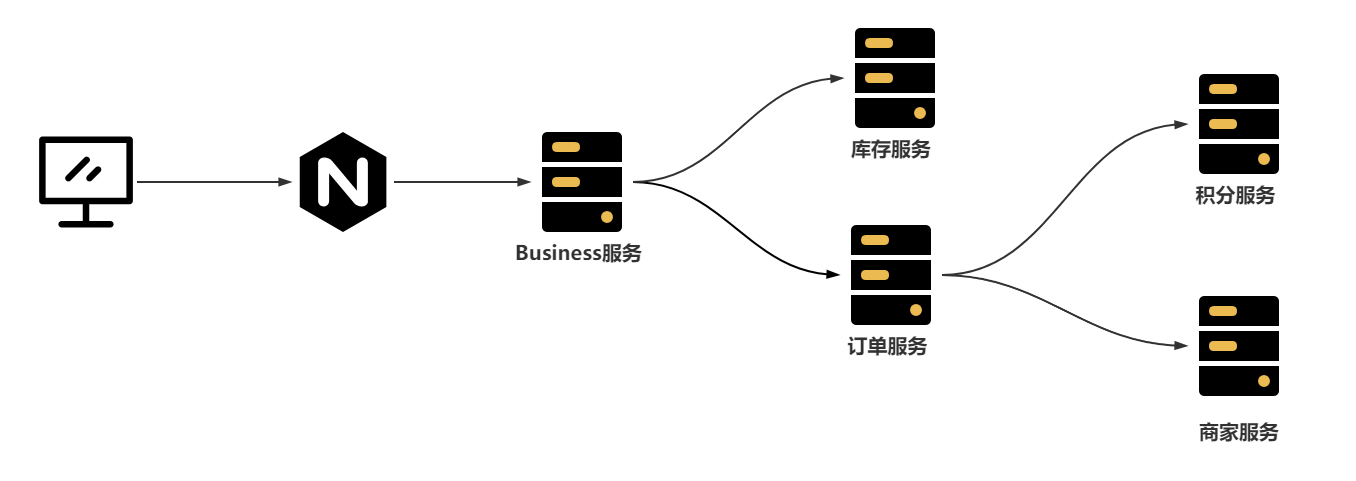
#### 1.2 处理问题
RabbitMQ就可以解决上述的全部问题
- 服务之间如何想实现可靠的异步调用,可以通过RabbitMQ的方式实现,服务A只需要保证可以把消息发送到RabbitMQ的队列中,服务B就一定会消费到队列中的消息只不过会存在一定的延时。| 异步访问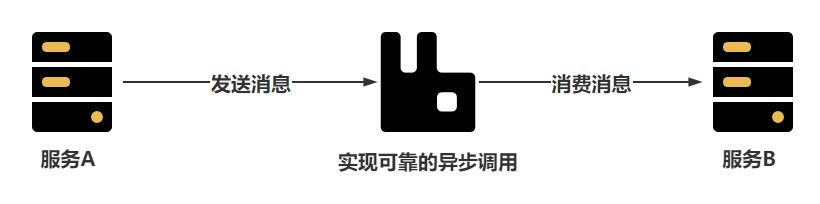
- 忽然的海量请求可以存储在RabbitMQ的队列中,然后由消费者慢慢消费掉,RabbitMQ的队列本身就可以存储上千万条消息 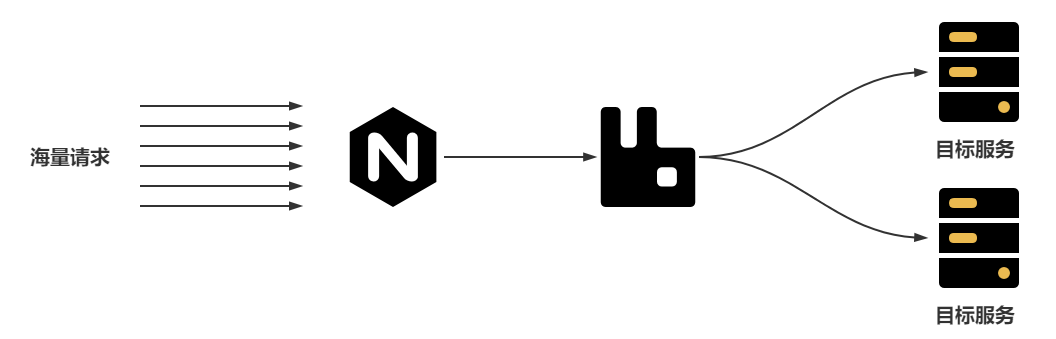
- 在调用其他服务时,如果允许延迟效果的出现,可以将消息发送到RabbitMQ中,再由消费者慢慢消费| 服务解耦
#### 1.3 RabbitMQ介绍
百度百科:
> **RabbitMQ**是实现了高级消息队列协议(AMQP)的开源消息代理软件(亦称面向消息的中间件)。RabbitMQ服务器是用[Erlang](https://baike.baidu.com/item/Erlang)语言编写的,而集群和故障转移是构建在[开放电信平台](https://baike.baidu.com/item/开放电信平台)框架上的。所有主要的[编程语言](https://baike.baidu.com/item/编程语言/9845131)均有与代理接口通讯的[客户端](https://baike.baidu.com/item/客户端/101081)库。
首先RabbitMQ基于AMQP协议开发,所以很多基于AMQP协议的功能RabbitMQ都是支持的,比如SpringCloud中的消息总线bus
其次RabbitMQ是基于Erlang编写,这是也是RabbitMQ天生的优势,Erlang被称为面向并发编程的语言,并发能力极强,在众多的MQ中,RabbitMQ的延迟特别低,在微秒级别,所以一般的业务处理RabbitMQ比Kafka和RocketMQ更有优势。
最后RabbitMQ提供自带了图形化界面,操作方便,还自带了多种集群模式,可以保证RabbitMQ的高可用,并且SpringBoot默认就整合RabbitMQ,使用简单方便。
### 二、RabbitMQ安装
---
#### 2.1 安装RabbitMQ
这里推荐搭建采用Docker的方式在Linux中安装RabbitMQ,如果对Docker不了解,推荐去学习一下Docker的应用,不然学习其他的知识时,安装的成本都特别高,这里我们就采用Docker的方式安装RabbitMQ。
直接使用docker-compose.yml文件即可安装RabbitMQ服务
```yml
version: '3.1'
services:
rabbitmq:
restart: always
image: daocloud.io/library/rabbitmq:3.8.8
volumes:
- ./data/:/var/lib/rabbitmq/
- ./log/:/var/log/rabbitmq/log/
ports:
- 15672:15672
- 5672:5672
```
执行 `docker-compose up -d`运行
测试效果:`curl localhost:5672`
| 查看效果 |
| :--------------------------------------------------------------------------------------------------------------------------------------------: |
|  |
#### 2.2 开启图形化界面
默认情况下,当前镜像的图形化界面默认没有开启,需要进入到容器内部开启图形化管理界面
| 启动图形化界面插件 |
| :--------------------------------------------------------------------------------------------------------------------------------------------: |
| 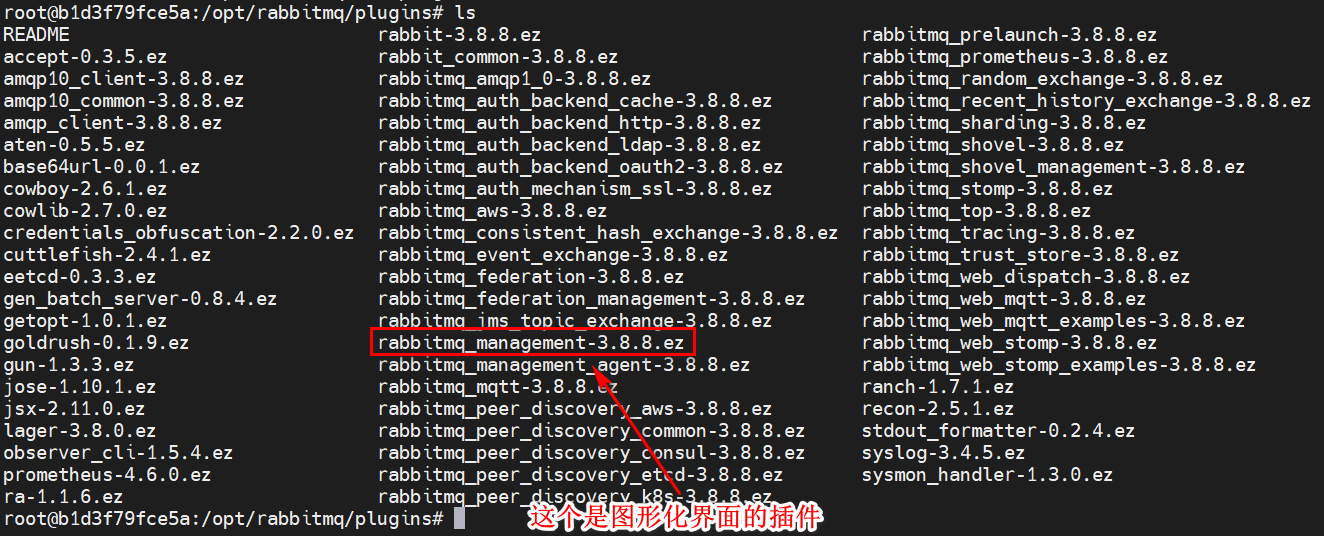 |
| 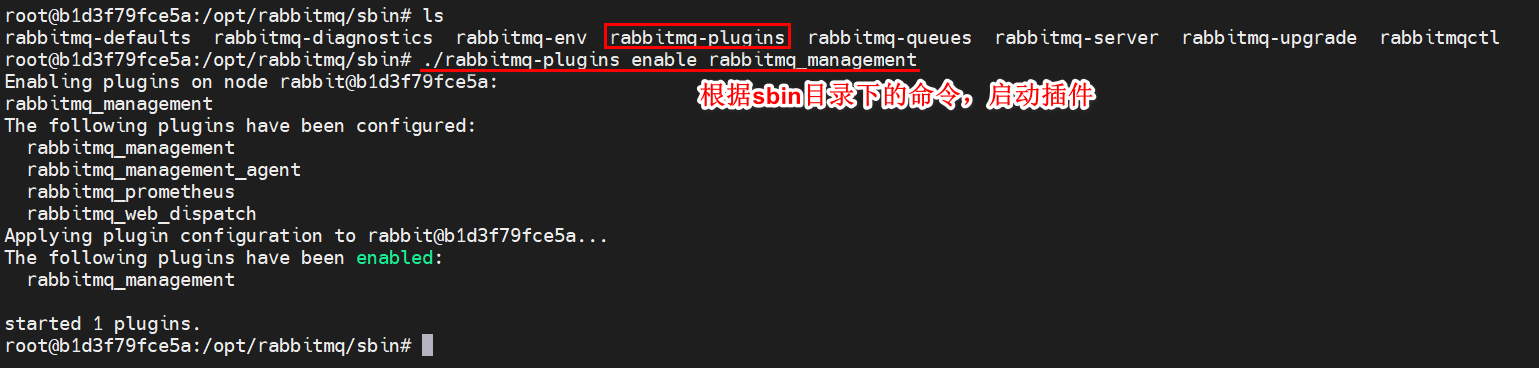 |
通过浏览器访问15672,查看图形化界面
| 查看登录页面 |
| :--------------------------------------------------------------------------------------------------------------------------------------------: |
|  |
默认用户和密码均为:guest,查看首页
| 查看首页 |
| :--------------------------------------------------------------------------------------------------------------------------------------------: |
| 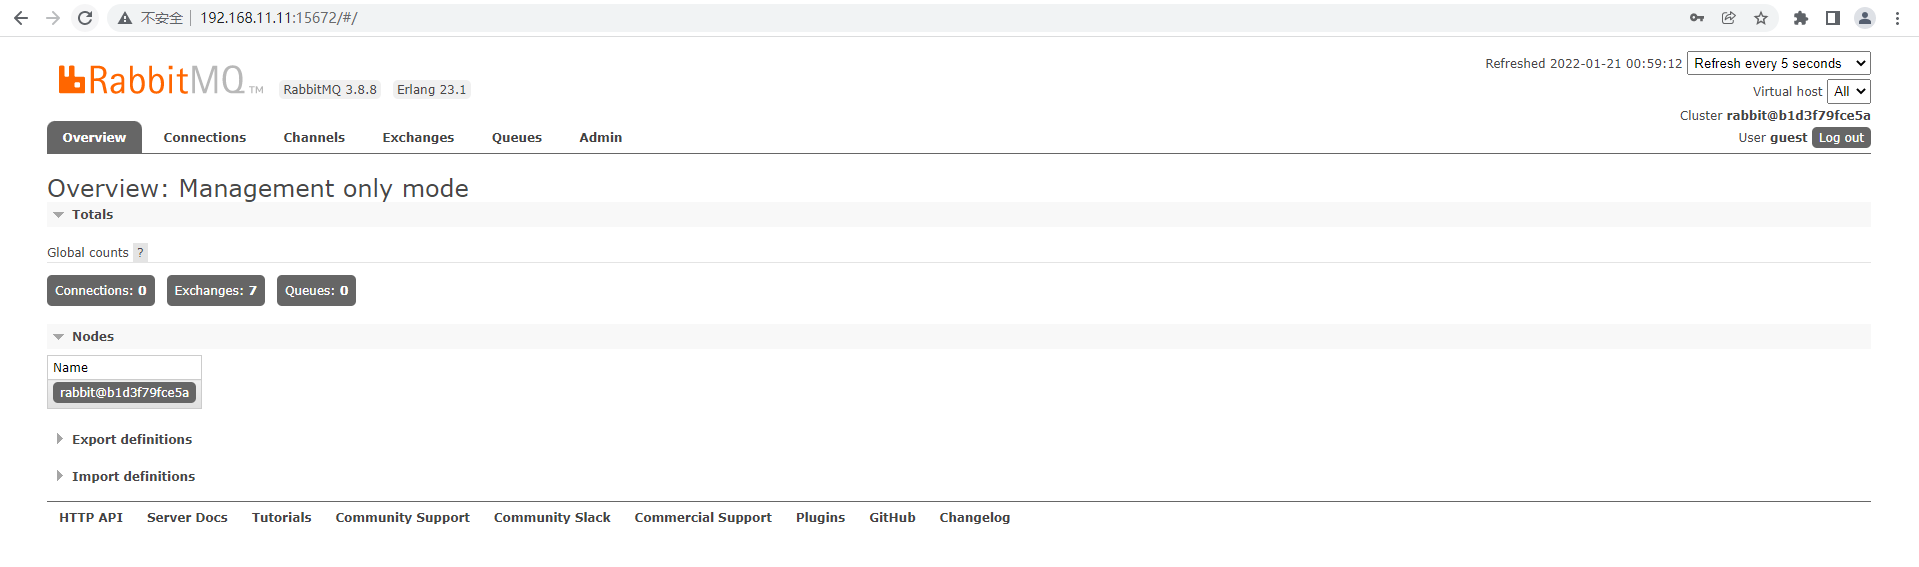 |
### 三、RabbitMQ构架
RabbitMQ的架构可以查看官方地址:https://rabbitmq.com/tutorials/amqp-concepts.html
| 官方简单架构 |
| :--------------------------------------------------------------------------------------------------------------------------------------------: |
| 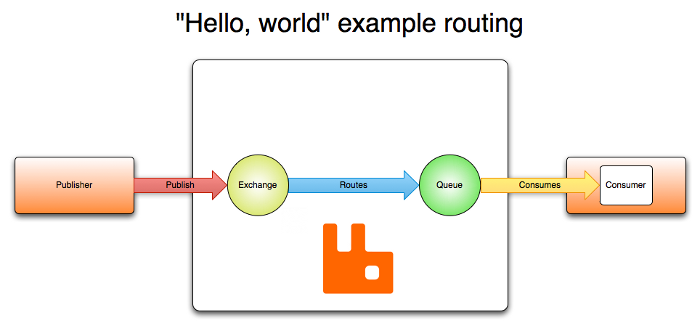 |
可以看出RabbitMQ中主要分为三个角色:
- Publisher:消息的发布者,将消息发布到RabbitMQ中的Exchange
- RabbitMQ服务:Exchange接收Publisher的消息,并且根据Routes策略将消息转发到Queue中
- Consumer:消息的消费者,监听Queue中的消息并进行消费
官方提供的架构图相对简洁,我们可以自己画一份相对完整一些的架构图:
| RabbitMQ架构图 |
| :--------------------------------------------------------------------------------------------------------------------------------------------: |
| 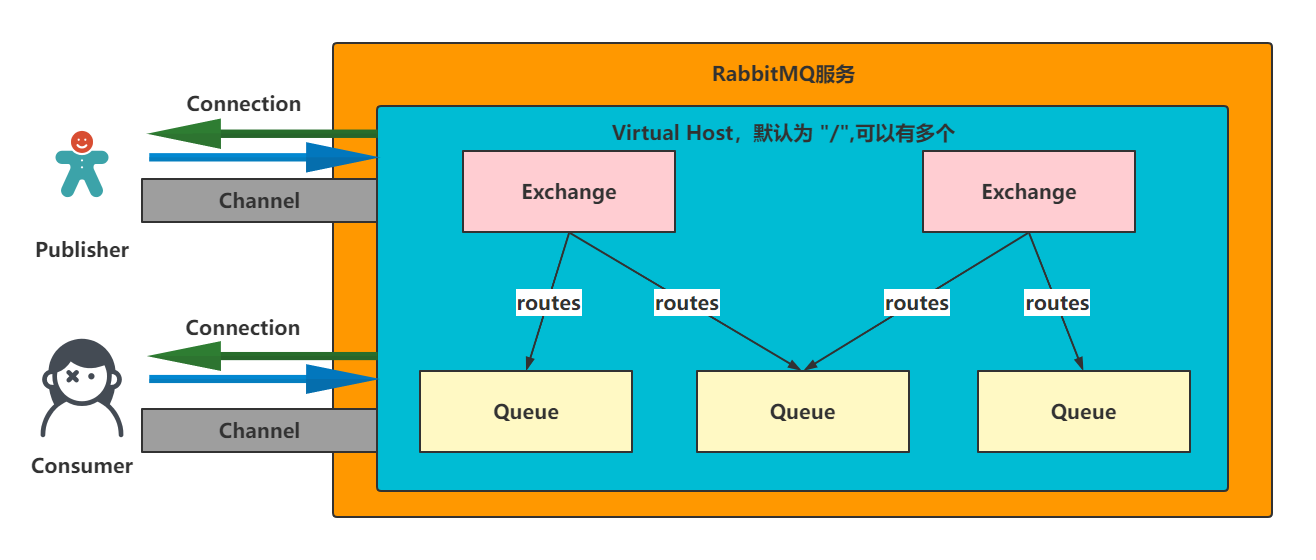 |
可以看出Publisher和Consumer都是单独和RabbitMQ服务中某一个Virtual Host建立Connection的客户端
后续通过Connection可以构建Channel通道,用来发布、接收消息
一个Virtual Host中可以有多个Exchange和Queue,Exchange可以同时绑定多个Queue
在基于架构图查看图形化界面,会更加清晰
| 图形化界面信息 |
| :--------------------------------------------------------------------------------------------------------------------------------------------: |
| 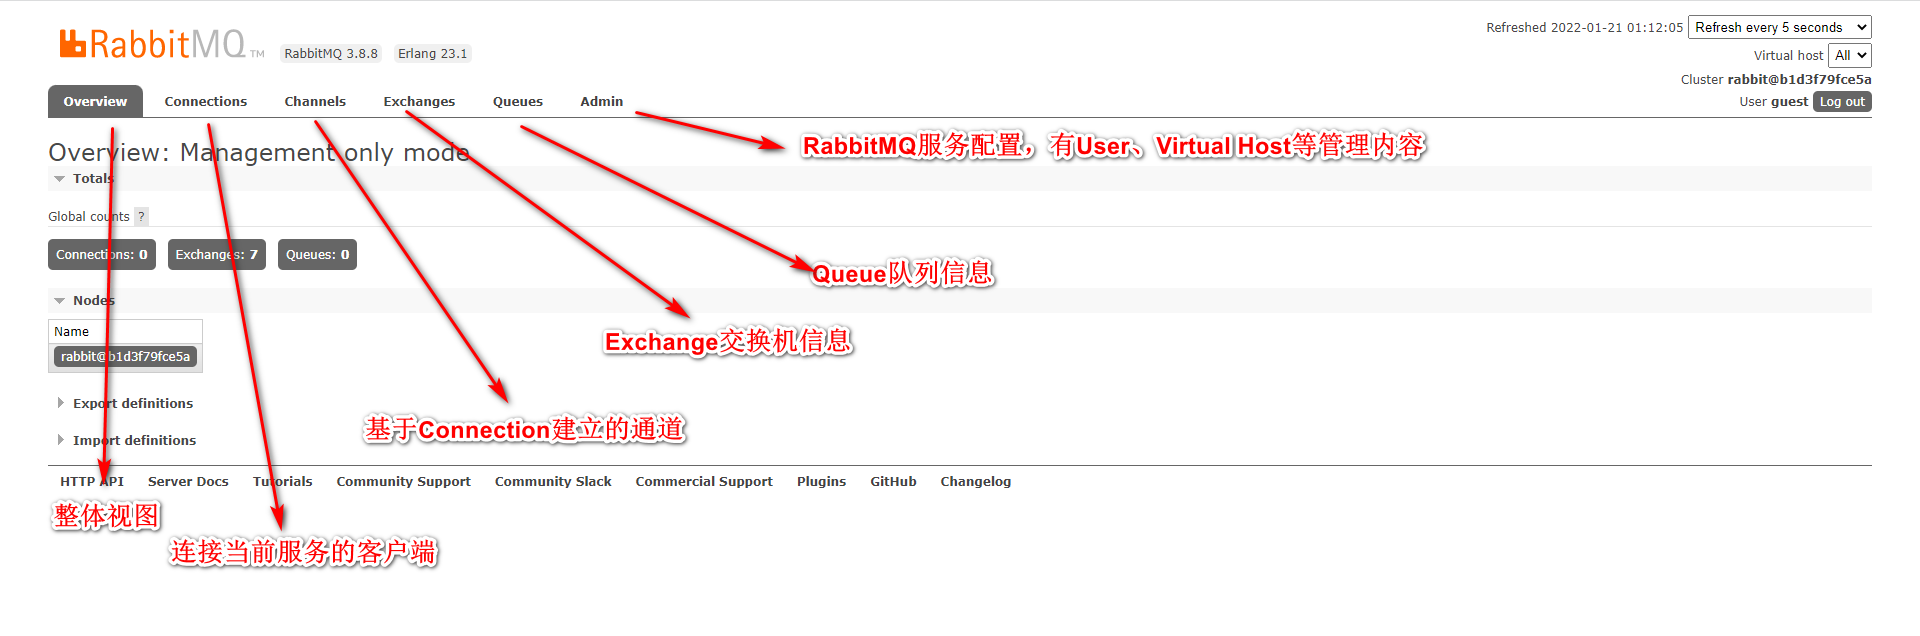 |
### 四、RabbitMQ通讯方式
---
RabbitMQ提供了很多中通讯方式,依然可以去官方查看:https://rabbitmq.com/getstarted.html
| 七种通讯方式 |
| :--------------------------------------------------------------------------------------------------------------------------------------------: |
| 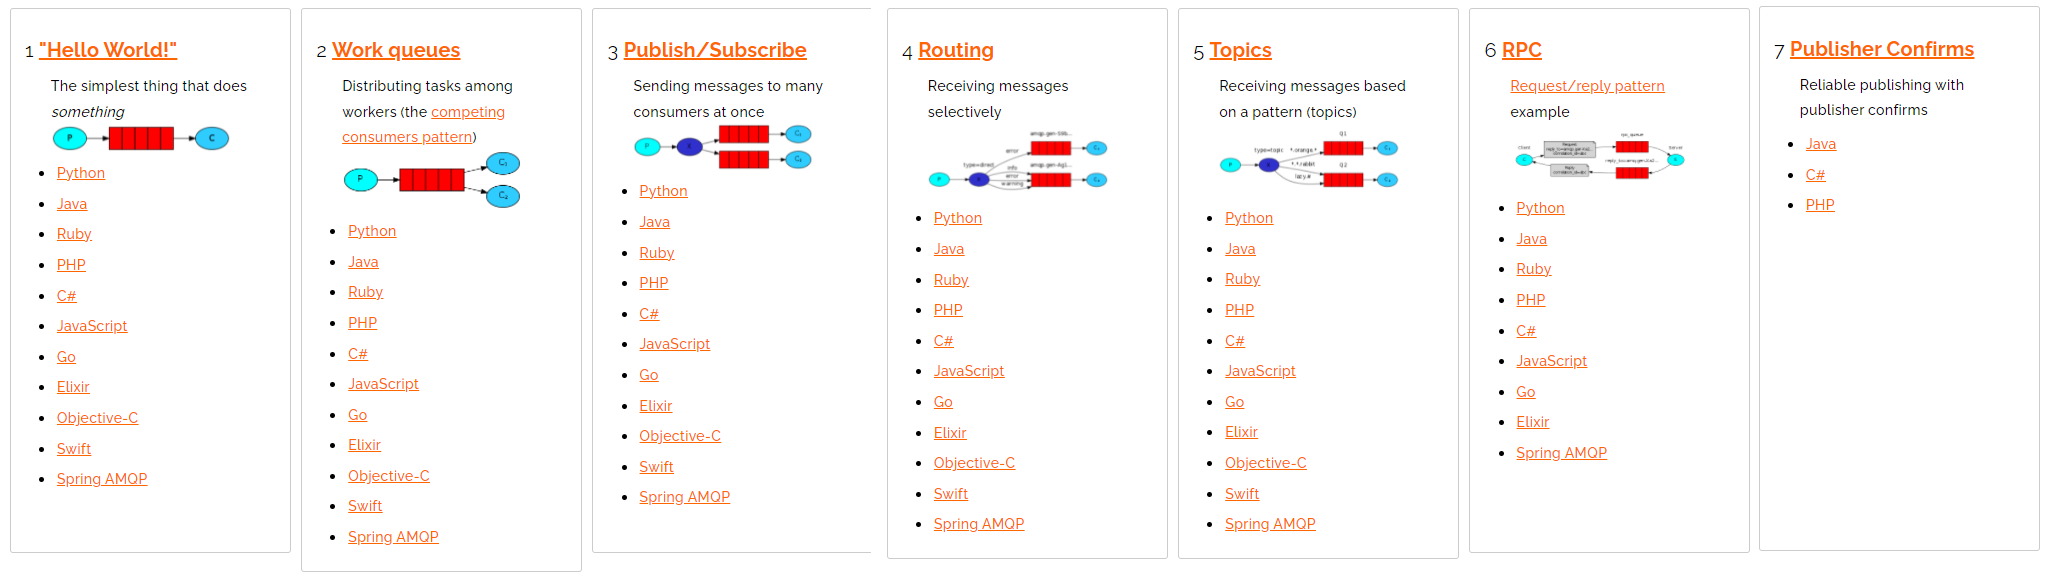 |
#### 4.1 RabbitMQ提供的通讯方式
- [Hello World!](https://rabbitmq.com/tutorials/tutorial-one-python.html):为了入门操作!
- [Work queues](https://rabbitmq.com/tutorials/tutorial-two-python.html):一个队列被多个消费者消费
- [Publish/Subscribe](https://rabbitmq.com/tutorials/tutorial-three-python.html):手动创建Exchange(FANOUT)
- [Routing](https://rabbitmq.com/tutorials/tutorial-four-python.html):手动创建Exchange(DIRECT)
- [Topics](https://rabbitmq.com/tutorials/tutorial-five-python.html):手动创建Exchange(TOPIC)
- [RPC](https://rabbitmq.com/tutorials/tutorial-six-python.html):RPC方式
- [Publisher Confirms](https://rabbitmq.com/tutorials/tutorial-seven-java.html):保证消息可靠性
#### 4.2 构建Connection工具类
- 导入依赖:amqp-client,junit
```xml
com.rabbitmq
amqp-client
5.9.0
junit
junit
4.12
```
- 构建工具类:
```java
package com.ajie.util;
import com.rabbitmq.client.Connection;
import com.rabbitmq.client.ConnectionFactory;
import java.io.IOException;
import java.util.concurrent.TimeoutException;
public class RabbitMQConnectionUtil {
public static final String HOST = "ajie103";
public static final int PORT = 5672;
public static final String USER = "ajie";
public static final String PASSWORD = "**********";
public static final String V_HOST = "/";
public static Connection getConnection() throws IOException, TimeoutException {
// 1.创建连接工厂
ConnectionFactory factory = new ConnectionFactory();
factory.setHost(HOST);
factory.setPort(PORT);
factory.setUsername(USER);
factory.setPassword(PASSWORD);
factory.setVirtualHost(V_HOST);
// 2.获取连接
return factory.newConnection();
}
}
```
#### 4.3 Hello World
| 通讯方式 |
| :------------------------------------------------------------------------------------------------------------------------------------: |
|  |
生产者:
```java
package com.ajie.helloworld;
import com.ajie.util.RabbitMQConnectionUtil;
import com.rabbitmq.client.Channel;
import com.rabbitmq.client.Connection;
import org.junit.Test;
import java.io.IOException;
import java.nio.charset.StandardCharsets;
import java.util.concurrent.TimeoutException;
public class Publisher {
public static final String QUEUE = "hello";
@Test
public void test() throws IOException, TimeoutException {
// 1.获取连接
try (Connection connection = RabbitMQConnectionUtil.getConnection()) {
//2.获取通道
try (Channel channel = connection.createChannel()) {
// 3.声明队列
channel.queueDeclare(QUEUE, false, false, false, null);
// 4. 发送消息
String message = "hello world";
channel.basicPublish("", QUEUE, null, message.getBytes(StandardCharsets.UTF_8));
System.out.println("发送消息成功");
System.in.read();
}
}
}
}
```
消费者:
```java
package com.ajie.helloworld;
import com.ajie.util.RabbitMQConnectionUtil;
import com.rabbitmq.client.*;
import org.junit.Test;
import java.io.IOException;
import java.util.concurrent.TimeoutException;
public class Consumer {
@Test
public void test() throws IOException, TimeoutException {
//1.创建连接
try (Connection connection = RabbitMQConnectionUtil.getConnection()) {
// 2. 创建通道
try (Channel channel = connection.createChannel()) {
// 3. 声明队列
channel.queueDeclare(Publisher.QUEUE, false, false, false, null);
// 4. 消费消息
DefaultConsumer callback = new DefaultConsumer(channel) {
@Override
public void handleDelivery(String consumerTag, Envelope envelope, AMQP.BasicProperties properties, byte[] body) throws IOException {
System.out.println("消费者获取到消息:" + new String(body));
}
};
channel.basicConsume(Publisher.QUEUE, true, callback);
System.out.println("开始监听队列");
System.in.read();
}
}
}
}
```
#### 4.4 Work Queues
| WorkQueues需要学习的内容 |
| :------------------------------------------------------------------------------------------------------------------------------------: |
|  |
- 生产者:生产者和Hello World的形式是一样的,都是将消息推送到默认交换机。
- 消费者:让消费者关闭自动ack,并且设置消息的流控,最终实现消费者可以尽可能去多消费消息
```java
package com.ajie.work;
import com.ajie.util.RabbitMQConnectionUtil;
import com.rabbitmq.client.*;
import org.junit.Test;
import java.io.IOException;
import java.util.concurrent.TimeUnit;
import java.util.concurrent.TimeoutException;
public class Consumer {
@Test
public void consumer1() throws IOException, TimeoutException {
//1.创建连接
try (Connection connection = RabbitMQConnectionUtil.getConnection()) {
// 2. 创建通道
try (Channel channel = connection.createChannel()) {
// 3. 声明队列
channel.queueDeclare(Publisher.QUEUE, false, false, false, null);
// 3.5 设置拉取消息的频率
channel.basicQos(1);
// 4. 消费消息
DefaultConsumer callback = new DefaultConsumer(channel) {
@Override
public void handleDelivery(String consumerTag, Envelope envelope, AMQP.BasicProperties properties, byte[] body) throws IOException {
try {
TimeUnit.MILLISECONDS.sleep(100);
} catch (InterruptedException e) {
throw new RuntimeException(e);
}
System.out.println("消费者1号获取到消息:" + new String(body));
channel.basicAck(envelope.getDeliveryTag(), false);
}
};
channel.basicConsume(Publisher.QUEUE, false, callback);
System.out.println("开始监听队列");
System.in.read();
}
}
}
@Test
public void consumer2() throws IOException, TimeoutException {
//1.创建连接
try (Connection connection = RabbitMQConnectionUtil.getConnection()) {
// 2. 创建通道
try (Channel channel = connection.createChannel()) {
// 3. 声明队列
channel.queueDeclare(Publisher.QUEUE, false, false, false, null);
// 3.5 设置拉取消息的频率
channel.basicQos(1);
// 4. 消费消息
DefaultConsumer callback = new DefaultConsumer(channel) {
@Override
public void handleDelivery(String consumerTag, Envelope envelope, AMQP.BasicProperties properties, byte[] body) throws IOException {
try {
TimeUnit.MILLISECONDS.sleep(1000);
} catch (InterruptedException e) {
throw new RuntimeException(e);
}
System.out.println("消费者2号获取到消息:" + new String(body));
channel.basicAck(envelope.getDeliveryTag(), false);
}
};
channel.basicConsume(Publisher.QUEUE, false, callback);
System.out.println("开始监听队列");
System.in.read();
}
}
}
}
```
#### 4.5 Publish/Subscribe
| 自定义一个交换机 |
| :------------------------------------------------------------------------------------------------------------------------------------: |
| 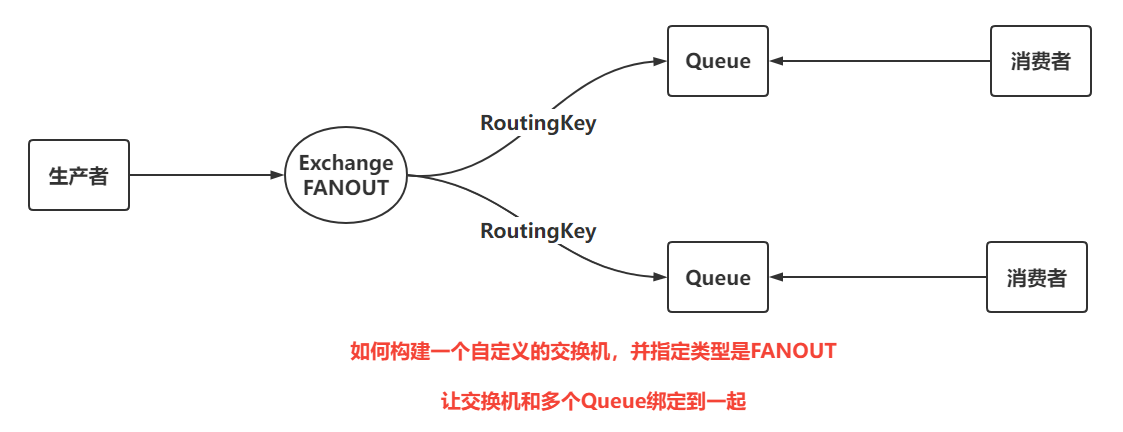 |
生产者:自行构建Exchange并绑定指定队列[(FANOUT类型)]()
```java
package com.ajie.pubsub;
import com.ajie.util.RabbitMQConnectionUtil;
import com.rabbitmq.client.BuiltinExchangeType;
import com.rabbitmq.client.Channel;
import com.rabbitmq.client.Connection;
import org.junit.Test;
import java.io.IOException;
import java.nio.charset.StandardCharsets;
import java.util.concurrent.TimeoutException;
public class Publisher {
public static final String EXCHANGE_NAME = "pubsub";
public static final String QUEUE_NAME1 = "pubsub-one";
public static final String QUEUE_NAME2 = "pubsub-two";
@Test
public void pubsub() throws IOException, TimeoutException {
// 1.获取连接
try (Connection connection = RabbitMQConnectionUtil.getConnection()) {
// 2.获取通道
try (Channel channel = connection.createChannel()) {
// 3.声明交换机
channel.exchangeDeclare(EXCHANGE_NAME, BuiltinExchangeType.FANOUT);
// 4.声明队列
channel.queueDeclare(QUEUE_NAME1, true, false, false, null);
channel.queueDeclare(QUEUE_NAME2, true, false, false, null);
// 5.绑定交换机和队列
channel.queueBind(QUEUE_NAME1, EXCHANGE_NAME, "");
channel.queueBind(QUEUE_NAME2, EXCHANGE_NAME, "");
// 6.发送消息
for (int i = 0; i < 10; i++) {
String message = "pubsub_" + i;
channel.basicPublish(EXCHANGE_NAME, "", null, message.getBytes(StandardCharsets.UTF_8));
}
System.out.println("发送消息成功");
System.in.read();
}
}
}
}
```
#### 4.6 Routing
| DIRECT类型Exchange |
| :------------------------------------------------------------------------------------------------------------------------------------: |
| 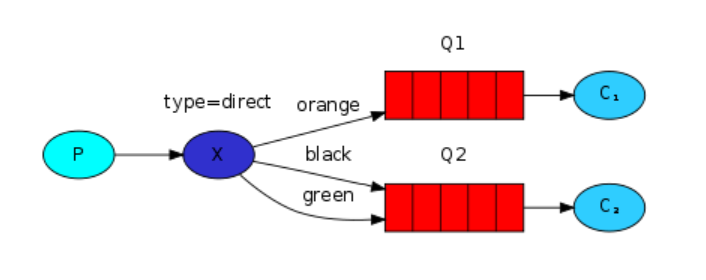 |
生产者:在绑定Exchange和Queue时,需要指定好routingKey,同时在发送消息时,也指定routingKey,只有routingKey一致时,才会把指定的消息路由到指定的Queue
```java
package com.ajie.routing;
import com.ajie.util.RabbitMQConnectionUtil;
import com.rabbitmq.client.BuiltinExchangeType;
import com.rabbitmq.client.Channel;
import com.rabbitmq.client.Connection;
import org.junit.Test;
import java.io.IOException;
import java.nio.charset.StandardCharsets;
import java.util.concurrent.TimeoutException;
public class Publisher {
public static final String EXCHANGE_NAME = "routing";
public static final String QUEUE_NAME1 = "routing-one";
public static final String QUEUE_NAME2 = "routing-two";
@Test
public void publish() throws IOException, TimeoutException {
// 1.获取连接
try (Connection connection = RabbitMQConnectionUtil.getConnection()) {
// 2.获取通道
try (Channel channel = connection.createChannel()) {
// 3.声明交换机
channel.exchangeDeclare(EXCHANGE_NAME, BuiltinExchangeType.DIRECT);
// 4.声明队列
channel.queueDeclare(QUEUE_NAME1, true, false, false, null);
channel.queueDeclare(QUEUE_NAME2, true, false, false, null);
// 5.绑定交换机和队列
channel.queueBind(QUEUE_NAME1, EXCHANGE_NAME, "ORANGE");
channel.queueBind(QUEUE_NAME2, EXCHANGE_NAME, "BLACK");
channel.queueBind(QUEUE_NAME2, EXCHANGE_NAME, "GREEN");
// 6.发送消息
channel.basicPublish(EXCHANGE_NAME,"ORANGE",null,"大橙子".getBytes(StandardCharsets.UTF_8));
channel.basicPublish(EXCHANGE_NAME,"BLACK",null,"黑布林".getBytes(StandardCharsets.UTF_8));
channel.basicPublish(EXCHANGE_NAME,"GREEN",null,"小白兔".getBytes(StandardCharsets.UTF_8));
System.out.println("发送消息成功");
System.in.read();
}
}
}
}
```
#### 4.7 Topic
| Topic模式 |
| :------------------------------------------------------------------------------------------------------------------------------------: |
| 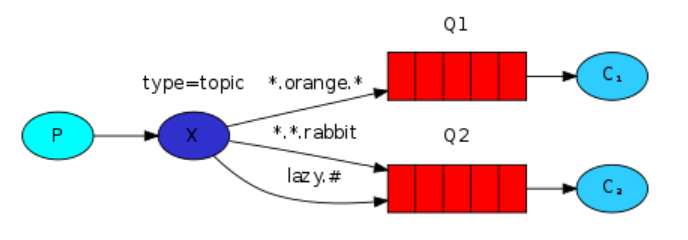 |
生产者:TOPIC类型可以编写带有特殊意义的routingKey的绑定方式
```java
package com.ajie.topic;
import com.ajie.util.RabbitMQConnectionUtil;
import com.rabbitmq.client.BuiltinExchangeType;
import com.rabbitmq.client.Channel;
import com.rabbitmq.client.Connection;
import org.junit.Test;
import java.io.IOException;
import java.nio.charset.StandardCharsets;
import java.util.concurrent.TimeoutException;
public class Publisher {
public static final String EXCHANGE_NAME = "topic";
public static final String QUEUE_NAME1 = "topic-one";
public static final String QUEUE_NAME2 = "topic-two";
@Test
public void publish() throws IOException, TimeoutException {
// 1.获取连接
try (Connection connection = RabbitMQConnectionUtil.getConnection()) {
// 2.获取通道
try (Channel channel = connection.createChannel()) {
// 3.声明交换机
channel.exchangeDeclare(EXCHANGE_NAME, BuiltinExchangeType.TOPIC);
// 4.声明队列
channel.queueDeclare(QUEUE_NAME1, true, false, false, null);
channel.queueDeclare(QUEUE_NAME2, true, false, false, null);
// 5.绑定交换机和队列
channel.queueBind(QUEUE_NAME1, EXCHANGE_NAME, "*.orange.*");
channel.queueBind(QUEUE_NAME2, EXCHANGE_NAME, "*.*.rabbit");
channel.queueBind(QUEUE_NAME2, EXCHANGE_NAME, "lazy.#");
// 6.发送消息
channel.basicPublish(EXCHANGE_NAME,"big.orange.rabbit",null,"大橙兔子".getBytes(StandardCharsets.UTF_8));
channel.basicPublish(EXCHANGE_NAME,"small.white.rabbit",null,"小白兔".getBytes(StandardCharsets.UTF_8));
channel.basicPublish(EXCHANGE_NAME,"lazy.dog.dog.dog.dog.dog.dog",null,"懒狗狗狗狗狗狗".getBytes(StandardCharsets.UTF_8));
System.out.println("发送消息成功");
System.in.read();
}
}
}
}
```
#### 4.8 RPC(了解)
> 因为两个服务在交互时,可以尽量做到Client和Server的解耦,通过RabbitMQ进行解耦操作
>
> 需要让Client发送消息时,携带两个属性:
>
> - replyTo告知Server将相应信息放到哪个队列
> - correlationId告知Server发送相应消息时,需要携带位置标示来告知Client响应的信息
| RPC方式 |
| :------------------------------------------------------------------------------------------------------------------------------------: |
|  |
客户端:
```java
package com.ajie.rpc;
import com.ajie.util.RabbitMQConnectionUtil;
import com.rabbitmq.client.*;
import org.junit.Test;
import java.io.IOException;
import java.util.UUID;
public class Publisher {
public static final String QUEUE_PUBLISHER = "rpc_publisher";
public static final String QUEUE_CONSUMER = "rpc_consumer";
@Test
public void publish() throws Exception {
//1. 获取连接对象
Connection connection = RabbitMQConnectionUtil.getConnection();
//2. 构建Channel
Channel channel = connection.createChannel();
//3. 构建队列
channel.queueDeclare(QUEUE_PUBLISHER,false,false,false,null);
channel.queueDeclare(QUEUE_CONSUMER,false,false,false,null);
//4. 发布消息
String message = "Hello RPC!";
String uuid = UUID.randomUUID().toString();
AMQP.BasicProperties props = new AMQP.BasicProperties()
.builder()
.replyTo(QUEUE_CONSUMER)
.correlationId(uuid)
.build();
channel.basicPublish("",QUEUE_PUBLISHER,props,message.getBytes());
channel.basicConsume(QUEUE_CONSUMER,false,new DefaultConsumer(channel){
@Override
public void handleDelivery(String consumerTag, Envelope envelope, AMQP.BasicProperties properties, byte[] body) throws IOException {
String id = properties.getCorrelationId();
if(id != null && id.equalsIgnoreCase(uuid)){
System.out.println("接收到服务端的响应:" + new String(body,"UTF-8"));
}
channel.basicAck(envelope.getDeliveryTag(),false);
}
});
System.out.println("消息发送成功!");
System.in.read();
}
}
```
服务端:
```java
package com.ajie.rpc;
import com.ajie.util.RabbitMQConnectionUtil;
import com.rabbitmq.client.*;
import org.junit.Test;
import java.io.IOException;
/**
* @author zjw
* @description
* @date 2022/1/24 23:02
*/
public class Consumer {
public static final String QUEUE_PUBLISHER = "rpc_publisher";
public static final String QUEUE_CONSUMER = "rpc_consumer";
@Test
public void consume() throws Exception {
//1. 获取连接对象
Connection connection = RabbitMQConnectionUtil.getConnection();
//2. 构建Channel
Channel channel = connection.createChannel();
//3. 构建队列
channel.queueDeclare(QUEUE_PUBLISHER,false,false,false,null);
channel.queueDeclare(QUEUE_CONSUMER,false,false,false,null);
//4. 监听消息
DefaultConsumer callback = new DefaultConsumer(channel){
@Override
public void handleDelivery(String consumerTag, Envelope envelope, AMQP.BasicProperties properties, byte[] body) throws IOException {
System.out.println("消费者获取到消息:" + new String(body,"UTF-8"));
String resp = "获取到了client发出的请求,这里是响应的信息";
String respQueueName = properties.getReplyTo();
String uuid = properties.getCorrelationId();
AMQP.BasicProperties props = new AMQP.BasicProperties()
.builder()
.correlationId(uuid)
.build();
channel.basicPublish("",respQueueName,props,resp.getBytes());
channel.basicAck(envelope.getDeliveryTag(),false);
}
};
channel.basicConsume(QUEUE_PUBLISHER,false,callback);
System.out.println("开始监听队列");
System.in.read();
}
}
```
### 五、SpringBoot操作RabbitMQ
---
#### 5.1 SpringBoot声明信息
- 创建项目
- 导入依赖
```xml
org.springframework.boot
spring-boot-starter-amqp
```
- 配置RabbitMQ信息
```yml
spring:
rabbitmq:
host: ajie103
port: 5672
username: ajie
password: ***********
virtual-host: /
```
- 声明交换机&队列
```java
package com.ajie.config;
import org.springframework.amqp.core.*;
import org.springframework.amqp.rabbit.core.RabbitTemplate;
import org.springframework.boot.SpringBootConfiguration;
import org.springframework.context.annotation.Bean;
@SpringBootConfiguration
public class RabbitMQConfig {
public static final String EXCHANGE = "boot-exchange";
public static final String QUEUE = "boot-queue";
public static final String ROUTING_KEY = "*.black.*";
@Bean
public Exchange bootExchange() {
return ExchangeBuilder.topicExchange(EXCHANGE).build();
}
@Bean
public Queue bootQueue() {
return QueueBuilder.durable(QUEUE).build();
}
@Bean
public Binding bootBinding(Exchange bootExchange, Queue bootQueue) {
return BindingBuilder.bind(bootQueue).to(bootExchange).with(ROUTING_KEY).noargs();
}
}
```
```
#### 5.2 生产者操作
```java
package com.ajie;
import com.ajie.config.RabbitMQConfig;
import org.junit.jupiter.api.Test;
import org.springframework.amqp.AmqpException;
import org.springframework.amqp.core.Message;
import org.springframework.amqp.core.MessagePostProcessor;
import org.springframework.amqp.rabbit.core.RabbitTemplate;
import org.springframework.beans.factory.annotation.Autowired;
import org.springframework.beans.factory.annotation.Qualifier;
import org.springframework.boot.test.context.SpringBootTest;
import java.io.IOException;
import java.util.Optional;
@SpringBootTest
public class PublisherTest {
@Autowired
private RabbitTemplate rabbitTemplate;
@Test
public void publish() throws IOException {
rabbitTemplate.convertAndSend(RabbitMQConfig.EXCHANGE,"big.black.dog","message");
System.out.println("消息发送成功");
}
@Test
public void publishWithProperties(){
rabbitTemplate.convertAndSend(RabbitMQConfig.EXCHANGE, "big.black.dog", "messageWithProps",
new MessagePostProcessor() {
@Override
public Message postProcessMessage(Message message) throws AmqpException {
message.getMessageProperties()
.setCorrelationId("123");
return message;
}
}
);
System.out.println("消息发送成功");
}
}
```
#### 5.3 消费者操作
```java
package com.ajie.listener;
import com.ajie.config.RabbitMQConfig;
import com.rabbitmq.client.Channel;
import org.springframework.amqp.core.Message;
import org.springframework.amqp.rabbit.annotation.RabbitListener;
import org.springframework.stereotype.Component;
import java.io.IOException;
@Component
public class ConsumerListener {
@RabbitListener(queues = RabbitMQConfig.QUEUE)
public void consume(String msg, Channel channel, Message message) throws IOException {
System.out.println("队列的消息为:" + msg);
String correlationId = message.getMessageProperties().getCorrelationId();
System.out.println("唯一标识:"+correlationId);
long deliveryTag = message.getMessageProperties().getDeliveryTag();
channel.basicAck(deliveryTag, false);
}
}
```
### 六、RabbitMQ保证消息可靠性
---
#### 6.1 保证消息一定送达到Exchange
Confirm机制
可以通过Confirm效果保证消息一定送达到Exchange,官方提供了三种方式,选择了对于效率影响最低的异步回调的效果
```java
// 4.开启confirm
channel.confirmSelect();
// 5.设置confirms的异步回调
channel.addConfirmListener(new ConfirmListener() {
@Override
public void handleAck(long deliveryTag, boolean multiple) {
System.out.println("消息成功的发送到Exchange!");
}
@Override
public void handleNack(long deliveryTag, boolean multiple) {
System.out.println("消息没有发送到Exchange,尝试重试,或者保存到数据库做其他补偿操作!");
}
});
```
#### 6.2 保证消息可以路由到Queue
Return机制
为了保证Exchange上的消息一定可以送达到Queue
```java
// 6.设置Return回调,确认消息是否路由到Queue
channel.addReturnListener(new ReturnListener() {
@Override
public void handleReturn(int replyCode, String replyText, String exchange, String routingKey, AMQP.BasicProperties properties, byte[] body) throws IOException {
System.out.println("消息没有路由到queue");
}
});
//7. 在发送消息时,将basicPublish方法参数中的mandatory设置为true,即可开启Return机制,当消息没有路由到队列中时,就会执行return回调
```
#### 6.3 保证Queue可以持久化消息
DeliveryMode设置消息持久化
DeliveryMode设置为2代表持久化,如果设置为1,就代表不会持久化。
```java
//7. 设置消息持久化
AMQP.BasicProperties props = new AMQP.BasicProperties()
.builder()
.deliveryMode(2)
.build();
//7. 发布消息
channel.basicPublish("","confirms",true,props,message.getBytes());
```
#### 6.4 保证消费者可以正常消费消息
`详情看WorkQueue模式`
#### 6.5 SpringBoot实现上述操作
##### 6.5.1 Confirm
- 编写配置文件开启Confirm机制
```yml
spring:
rabbitmq:
publisher-confirm-type: correlated # 新版本
publisher-confirms: true # 老版本
```
- 在发送消息时,配置RabbitTemplate
```java
@Test
public void publishWithConfirms() throws IOException {
rabbitTemplate.setConfirmCallback(new RabbitTemplate.ConfirmCallback() {
@Override
public void confirm(CorrelationData correlationData, boolean ack, String cause) {
if (ack) {
System.out.println("消息已经送达到交换机!!");
} else {
System.out.println("消息没有送达到Exchange,需要做一些补偿操作!!retry!!!");
}
}
});
rabbitTemplate.convertAndSend(RabbitMQConfig.EXCHANGE, "big.black.dog", "message");
System.out.println("消息发送成功");
System.in.read();
}
```
##### 6.5.2 Return
- 编写配置文件开启Return机制
```yml
spring:
rabbitmq:
publisher-returns: true # 开启Return机制
```
- 在发送消息时,配置RabbitTemplate
```java
@Test
public void publishWithReturn() throws IOException {
rabbitTemplate.setReturnsCallback(new RabbitTemplate.ReturnsCallback() {
@Override
public void returnedMessage(ReturnedMessage returned) {
String msg = new String(returned.getMessage().getBody());
System.out.println("消息:" + msg + "路由队列失败!!做补救操作!!");
}
});
rabbitTemplate.convertAndSend(RabbitMQConfig.EXCHANGE, "big.blacks.dog", "message");
System.out.println("消息发送成功");
System.in.read();
}
```
##### 6.5.3 消息持久化
```java
@Test
public void publishWithBasicProperties() throws IOException {
rabbitTemplate.convertAndSend(RabbitMQConfig.EXCHANGE, "big.black.dog", "message", new MessagePostProcessor() {
@Override
public Message postProcessMessage(Message message) throws AmqpException {
message.getMessageProperties()
.setDeliveryMode(MessageDeliveryMode.PERSISTENT);
return message;
}
});
System.out.println("消息发送成功");
System.in.read();
}
```
### 七、RabbitMQ死信队列&延迟交换机
#### 7.1 什么是死信
| 死信&死信队列 |
| :-----------------------------------------------------------------------------------------------------------------------------------: |
| 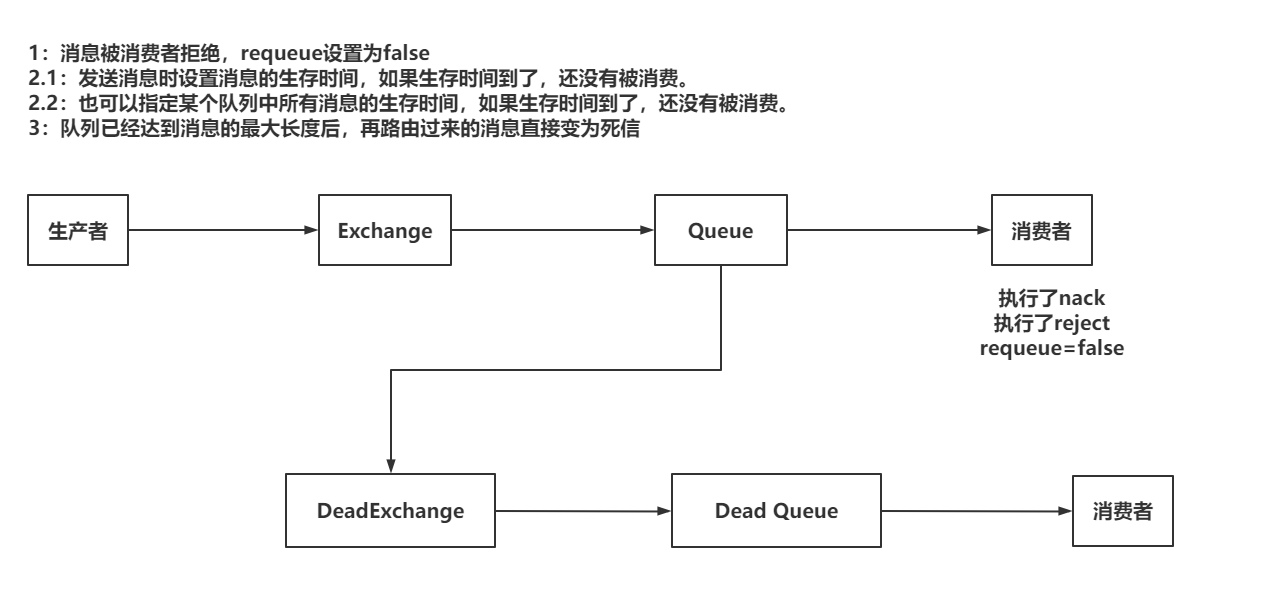 |
死信队列的应用:
- 基于死信队列在队列消息已满的情况下,消息也不会丢失
- 实现延迟消费的效果。比如:下订单时,有15分钟的付款时间
#### 7.2 实现死信队列
##### 7.2.1 准备Exchange&Queue
```java
package com.ajie.config;
import org.springframework.amqp.core.*;
import org.springframework.boot.SpringBootConfiguration;
import org.springframework.context.annotation.Bean;
@SpringBootConfiguration
public class DeadLetterConfig {
public static final String NORMAL_EXCHANGE = "normal-exchange";
public static final String NORMAL_QUEUE = "normal-queue";
public static final String NORMAL_ROUTING_KEY = "normal.#";
public static final String DEAD_EXCHANGE = "dead-exchange";
public static final String DEAD_QUEUE = "dead-queue";
public static final String DEAD_ROUTING_KEY = "dead.#";
@Bean
public Exchange normalExchange() {
return ExchangeBuilder.topicExchange(NORMAL_EXCHANGE)
.build();
}
@Bean
public Queue normalQueue() {
return QueueBuilder.durable(NORMAL_QUEUE)
.deadLetterExchange(DEAD_EXCHANGE)
.deadLetterRoutingKey(DEAD_ROUTING_KEY)
.build();
}
@Bean
public Binding normalBinding(Exchange normalExchange, Queue normalQueue) {
return BindingBuilder.bind(normalQueue)
.to(normalExchange)
.with(NORMAL_ROUTING_KEY)
.noargs();
}
@Bean
public Exchange deadExchange() {
return ExchangeBuilder.topicExchange(DEAD_EXCHANGE).build();
}
@Bean
public Queue deadQueue() {
return QueueBuilder.durable(DEAD_QUEUE).build();
}
@Bean
public Binding deadBinding(Exchange deadExchange, Queue deadQueue) {
return BindingBuilder.bind(deadQueue)
.to(deadExchange)
.with(DEAD_ROUTING_KEY)
.noargs();
}
}
```
##### 7.2.2 实现效果
- 基于消费者进行reject或者nack实现死信效果
```java
package com.ajie.listener;
import com.ajie.config.DeadLetterConfig;
import com.rabbitmq.client.Channel;
import org.springframework.amqp.core.Message;
import org.springframework.amqp.rabbit.annotation.RabbitListener;
import org.springframework.stereotype.Component;
import java.io.IOException;
@Component
public class DeadListener {
@RabbitListener(queues = DeadLetterConfig.NORMAL_QUEUE)
public void consume(String msg, Channel channel, Message message) throws IOException {
System.out.println("接收到normal队列的消息:" + msg);
channel.basicReject(message.getMessageProperties().getDeliveryTag(),false);
channel.basicNack(message.getMessageProperties().getDeliveryTag(), false, false);
}
}
```
- 消息的生存时间
- 给消息设置生存时间
```java
@Test
public void publishWithExpire() {
String message = "dead-latter-expire!!!";
rabbitTemplate.convertAndSend(DeadLetterConfig.NORMAL_EXCHANGE, "normal.a.a.a", message.getBytes(StandardCharsets.UTF_8),
new MessagePostProcessor() {
@Override
public Message postProcessMessage(Message message) throws AmqpException {
message.getMessageProperties()
.setExpiration("5000");
return message;
}
});
System.out.println("消息发送成功!!!");
}
```
- 给队列设置消息的生存时间
```java
@Bean
public Queue normalQueue() {
return QueueBuilder.durable(NORMAL_QUEUE)
.deadLetterExchange(DEAD_EXCHANGE)
.deadLetterRoutingKey(DEAD_ROUTING_KEY)
.ttl(10000)
.build();
}
```
- 设置Queue中的消息最大长度
```java
@Bean
public Queue normalQueue() {
return QueueBuilder.durable(NORMAL_QUEUE)
.deadLetterExchange(DEAD_EXCHANGE)
.deadLetterRoutingKey("dead.abc")
.maxLength(1)
.build();
}
```
只要Queue中已经有一个消息,如果再次发送一个消息,这个消息会变为死信!
#### 7.3 延迟交换机
下载地址:https://github.com/rabbitmq/rabbitmq-delayed-message-exchange/releases/tag/3.8.9
死信队列实现延迟消费时,如果延迟时间比较复杂,比较多,直接使用死信队列时,需要创建大量的队列还对应不同的时间,可以采用延迟交换机来解决这个问题。
- 构建延迟交换机
```java
package com.ajie.config;
import org.springframework.amqp.core.*;
import org.springframework.boot.SpringBootConfiguration;
import org.springframework.context.annotation.Bean;
import java.util.HashMap;
import java.util.Map;
@SpringBootConfiguration
public class DelayedConfig {
public static final String DELAYED_EXCHANGE = "delayed-exchange";
public static final String DELAYED_QUEUE = "delayed-queue";
public static final String DELAYED_ROUTING_KEY = "delayed.#";
@Bean
public Exchange delayedExchange() {
Map arguments = new HashMap<>();
arguments.put("x-delayed-type", ExchangeTypes.TOPIC);
return new CustomExchange(DELAYED_EXCHANGE, "x-delayed-message",
true, false, arguments);
}
@Bean
public Queue delayedQueue() {
return QueueBuilder.durable(DELAYED_QUEUE).build();
}
@Bean
public Binding delayedBinding(Exchange delayedExchange, Queue delayedQueue) {
return BindingBuilder.bind(delayedQueue)
.to(delayedExchange)
.with(DELAYED_ROUTING_KEY)
.noargs();
}
}
```
- 发送消息
```java
package com.ajie;
import com.ajie.config.DelayedConfig;
import org.junit.jupiter.api.Test;
import org.springframework.amqp.AmqpException;
import org.springframework.amqp.core.Message;
import org.springframework.amqp.core.MessagePostProcessor;
import org.springframework.amqp.rabbit.core.RabbitTemplate;
import org.springframework.beans.factory.annotation.Autowired;
import org.springframework.boot.test.context.SpringBootTest;
@SpringBootTest
public class DelayedPublisherTest {
@Autowired
private RabbitTemplate rabbitTemplate;
@Test
public void publish() {
String message = "delayed message";
rabbitTemplate.convertAndSend(DelayedConfig.DELAYED_EXCHANGE, "delayed.abc", message, new MessagePostProcessor() {
@Override
public Message postProcessMessage(Message message) throws AmqpException {
message.getMessageProperties()
.setDelay(30000);
return message;
}
});
System.out.println("发送消息成功");
}
}
```
### 八、RabbitMQ的集群
RabbitMQ的镜像模式
| RabbitMQ的集群 |
| :-----------------------------------------------------------------------------------------------------------------------------------: |
|  |
高可用
提升RabbitMQ的效率
**搭建RabbitMQ集群**
- 准备两台虚拟机(克隆)
- 准备RabbitMQ的yml文件
rabbitmq1:
```yml
version: '3.5'
services:
rabbitmq1:
image: rabbitmq:3.8.5-management-alpine
container_name: rabbitmq1
environment:
- RABBITMQ_DEFAULT_USER=ajie
- RABBITMQ_DEFAULT_PASS=***********
- RABBITMQ_ERLANG_COOKIE=SAGEAGASEGFAG
hostname: rabbitmq1
extra_hosts:
- "rabbitmq1:10.0.0.184"
- "rabbitmq2:10.0.0.119"
volumes:
- ./data/:/var/lib/rabbitmq/
- ./log/:/var/log/rabbitmq/log/
ports:
- 15672:15672
- 5672:5672
- 4369:4369
- 25672:25672
```
rabbitmq2:
```yml
version: '3.5'
services:
rabbitmq2:
image: rabbitmq:3.8.5-management-alpine
container_name: rabbitmq2
environment:
- RABBITMQ_DEFAULT_USER=ajie
- RABBITMQ_DEFAULT_PASS=*************
- RABBITMQ_ERLANG_COOKIE=SAGEAGASEGFAG
hostname: rabbitmq2
extra_hosts:
- "rabbitmq1:10.0.0.184"
- "rabbitmq2:10.0.0.119"
volumes:
- ./data/:/var/lib/rabbitmq/
- ./log/:/var/log/rabbitmq/log/
ports:
- 15672:15672
- 5672:5672
- 4369:4369
- 25672:25672
```
准备完毕之后,启动两台RabbitMQ
| 启动效果 |
| :----------------------------------------------------------: |
|  |
- 让RabbitMQ服务实现join操作
需要四个命令完成join操作
让rabbitmq2 join rabbitmq1,需要进入到rabbitmq2的容器内部,去执行下述命令
```sh
rabbitmqctl stop_app
rabbitmqctl reset
rabbitmqctl join_cluster rabbit@rabbitmq1
rabbitmqctl start_app
```
执行成功后:
| 执行后 |
| :----------------------------------------------------------: |
|  |
- 设置镜像模式
在指定的RabbitMQ服务中设置好镜像策略即可
| 镜像模式 |
| :----------------------------------------------------------: |
|  |
### 九、RabbitMQ其他内容
#### 9.1 Headers类型Exchange
headers就是一个基于key-value的方式,让Exchange和Queue绑定的到一起的一种规则
相比Topic形式,可以采用的类型更丰富。
| headers绑定方式 |
| :-----------------------------------------------------------------------------------------------------------------------------------: |
|  |
具体实现方式
- 传统api实现
```java
package com.ajie.headers;
import com.ajie.util.RabbitMQConnectionUtil;
import com.rabbitmq.client.AMQP;
import com.rabbitmq.client.BuiltinExchangeType;
import com.rabbitmq.client.Channel;
import com.rabbitmq.client.Connection;
import org.junit.Test;
import java.io.IOException;
import java.util.HashMap;
import java.util.Map;
import java.util.concurrent.TimeoutException;
public class Publisher {
public static final String header_exchange = "header-exchange";
public static final String header_queue = "header-queue";
@Test
public void publish() throws IOException, TimeoutException {
// 1.获取连接
try (Connection connection = RabbitMQConnectionUtil.getConnection()) {
// 2.获取连接通道
try (Channel channel = connection.createChannel()) {
// 3.创建交换机
channel.exchangeDeclare(header_exchange, BuiltinExchangeType.HEADERS);
// 4.声明队列
channel.queueDeclare(header_queue, true, false, false, null);
Map args = new HashMap<>();
// 多个header的key-value只要可以匹配上一个就可以
// args.put("x-match","any");
// 多个header的key-value要求全部匹配上
args.put("x-match", "any");
args.put("name", "zhangsan");
args.put("age", "19");
// 5.绑定队列和交换机
channel.queueBind(header_queue, header_exchange, "", args);
// 5.发送消息
String message = "header 测试消息";
Map headers = new HashMap<>();
headers.put("name", "zhangsan");
headers.put("age", "20");
AMQP.BasicProperties properties = new AMQP.BasicProperties()
.builder()
.headers(headers)
.build();
channel.basicPublish(header_exchange, header_queue, properties, message.getBytes());
System.out.println("发送消息成功");
}
}
}
}
```
- springboot实现
- 创建交换机队列并进行绑定
```java
package com.ajie.config;
import org.springframework.amqp.core.*;
import org.springframework.boot.SpringBootConfiguration;
import org.springframework.context.annotation.Bean;
import java.util.HashMap;
import java.util.Map;
@SpringBootConfiguration
public class HeadersConfig {
public static final String header_exchange = "header-exchange";
public static final String header_queue = "header-queue";
@Bean
public Exchange headerExchange() {
return ExchangeBuilder.headersExchange(header_exchange).build();
}
@Bean
public Queue headerQueue() {
return QueueBuilder.durable(header_queue).build();
}
@Bean
public Binding headerBinding(Exchange headerExchange, Queue headerQueue) {
Map headers = new HashMap<>();
headers.put("x-match", "all");
headers.put("name", "zhangsan");
headers.put("age", 20);
return BindingBuilder.bind(headerQueue)
.to(headerExchange)
.with("")
.and(headers);
}
}
```
- 发送消息
```java
package com.ajie;
import com.ajie.config.HeadersConfig;
import org.junit.jupiter.api.Test;
import org.springframework.amqp.AmqpException;
import org.springframework.amqp.core.Message;
import org.springframework.amqp.core.MessagePostProcessor;
import org.springframework.amqp.rabbit.core.RabbitTemplate;
import org.springframework.beans.factory.annotation.Autowired;
import org.springframework.boot.test.context.SpringBootTest;
import java.util.HashMap;
import java.util.Map;
@SpringBootTest
public class HeadersPublisherTest {
@Autowired
private RabbitTemplate rabbitTemplate;
@Test
public void publish() {
String message = "headers springboot 测试";
rabbitTemplate.convertAndSend(HeadersConfig.header_exchange, "", message, new MessagePostProcessor() {
@Override
public Message postProcessMessage(Message message) throws AmqpException {
Map headers = new HashMap<>();
headers.put("name", "zhangsan");
headers.put("age", 20);
message.getMessageProperties()
.setHeaders(headers);
return message;
}
});
System.out.println("发送消息成功");
}
}
```