# Sentinel
**Repository Path**: csc_1_1/Sentinel
## Basic Information
- **Project Name**: Sentinel
- **Description**: 阿里巴巴流量治理组件,基于 1.8.5 版本改造,支持规则持久化,通过监控面板可查看历史数据。
- **Primary Language**: Java
- **License**: Apache-2.0
- **Default Branch**: 1.8.x
- **Homepage**: None
- **GVP Project**: No
## Statistics
- **Stars**: 0
- **Forks**: 2
- **Created**: 2024-06-19
- **Last Updated**: 2025-05-28
## Categories & Tags
**Categories**: Uncategorized
**Tags**: None
## README
 [license-apache2.0]:https://www.apache.org/licenses/LICENSE-2.0.html
[github-action]:https://github.com/shiyindaxiaojie/Sentinel/actions
[sonarcloud-dashboard]:https://sonarcloud.io/dashboard?id=shiyindaxiaojie_Sentinel
# Sentinel 流量治理平台
 [][license-apache2.0] [][github-action] [][sonarcloud-dashboard]
Sentinel 是阿里巴巴开源的流量治理平台,提供了 `流量控制`、`熔断降级`、`系统负载保护`、`黑白名单访问控制` 等功能。在实际的生产需求中,笔者进行了部分扩展:
1. 流控规则持久化:适配 `Apollo`、`Nacos`、`Zookeeper`
2. 监控数据持久化:适配 `InfluxDB`、`Kafka`、`Elasticsearch`
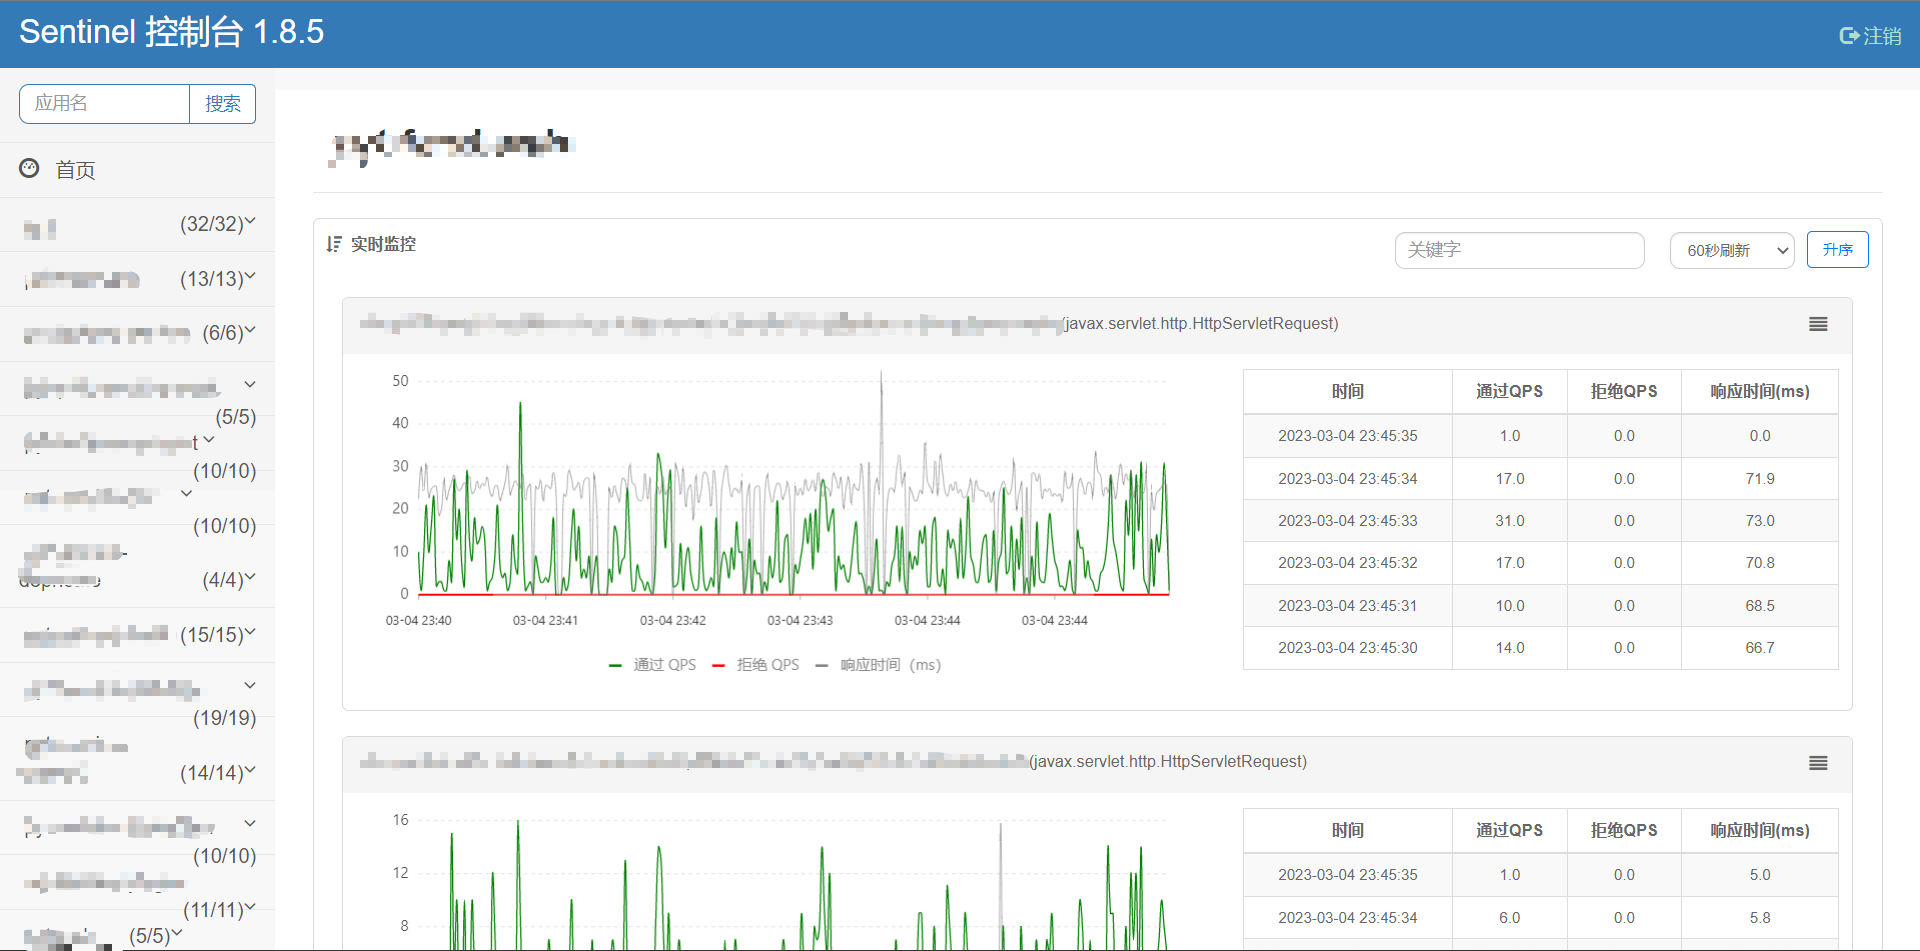
3. 监控面板优化:新增时间控件,允许在任意时刻内查询监控数据。
## 演示图例
### 改造前
### 改造后
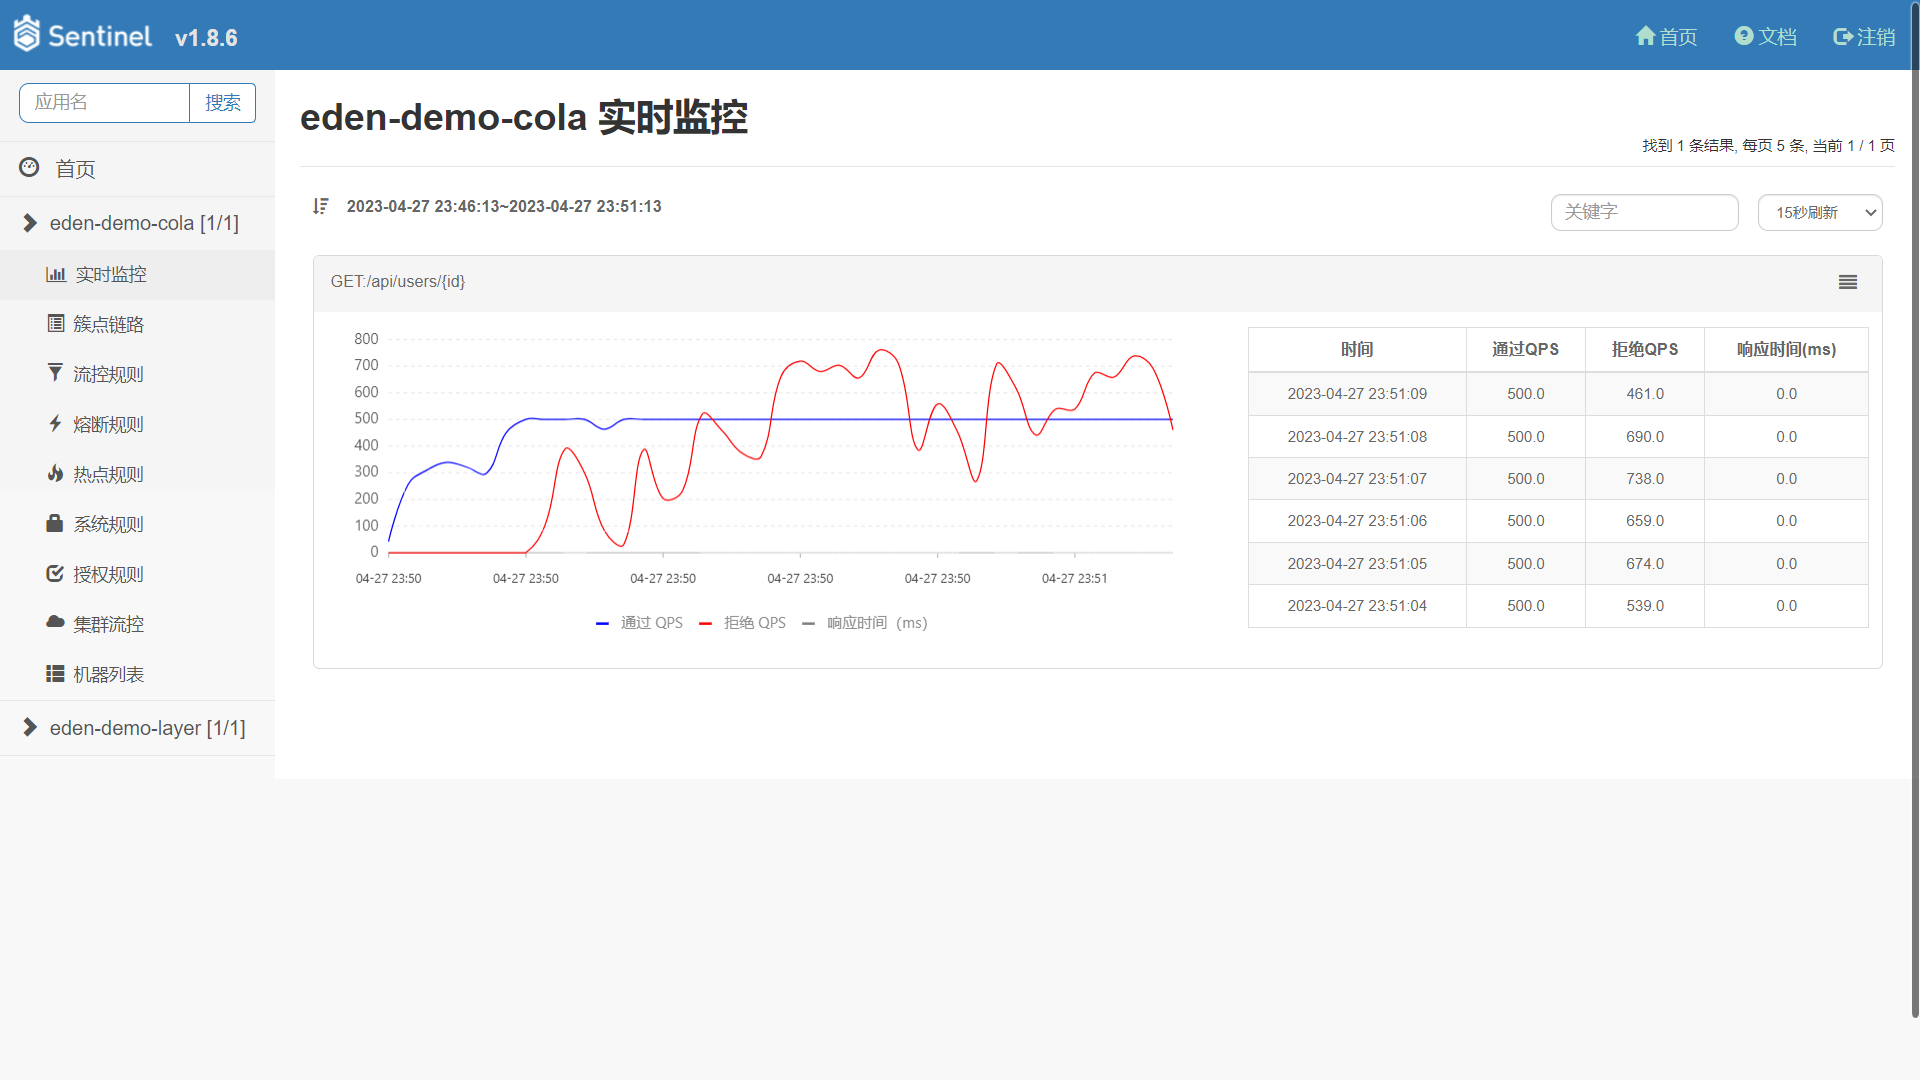
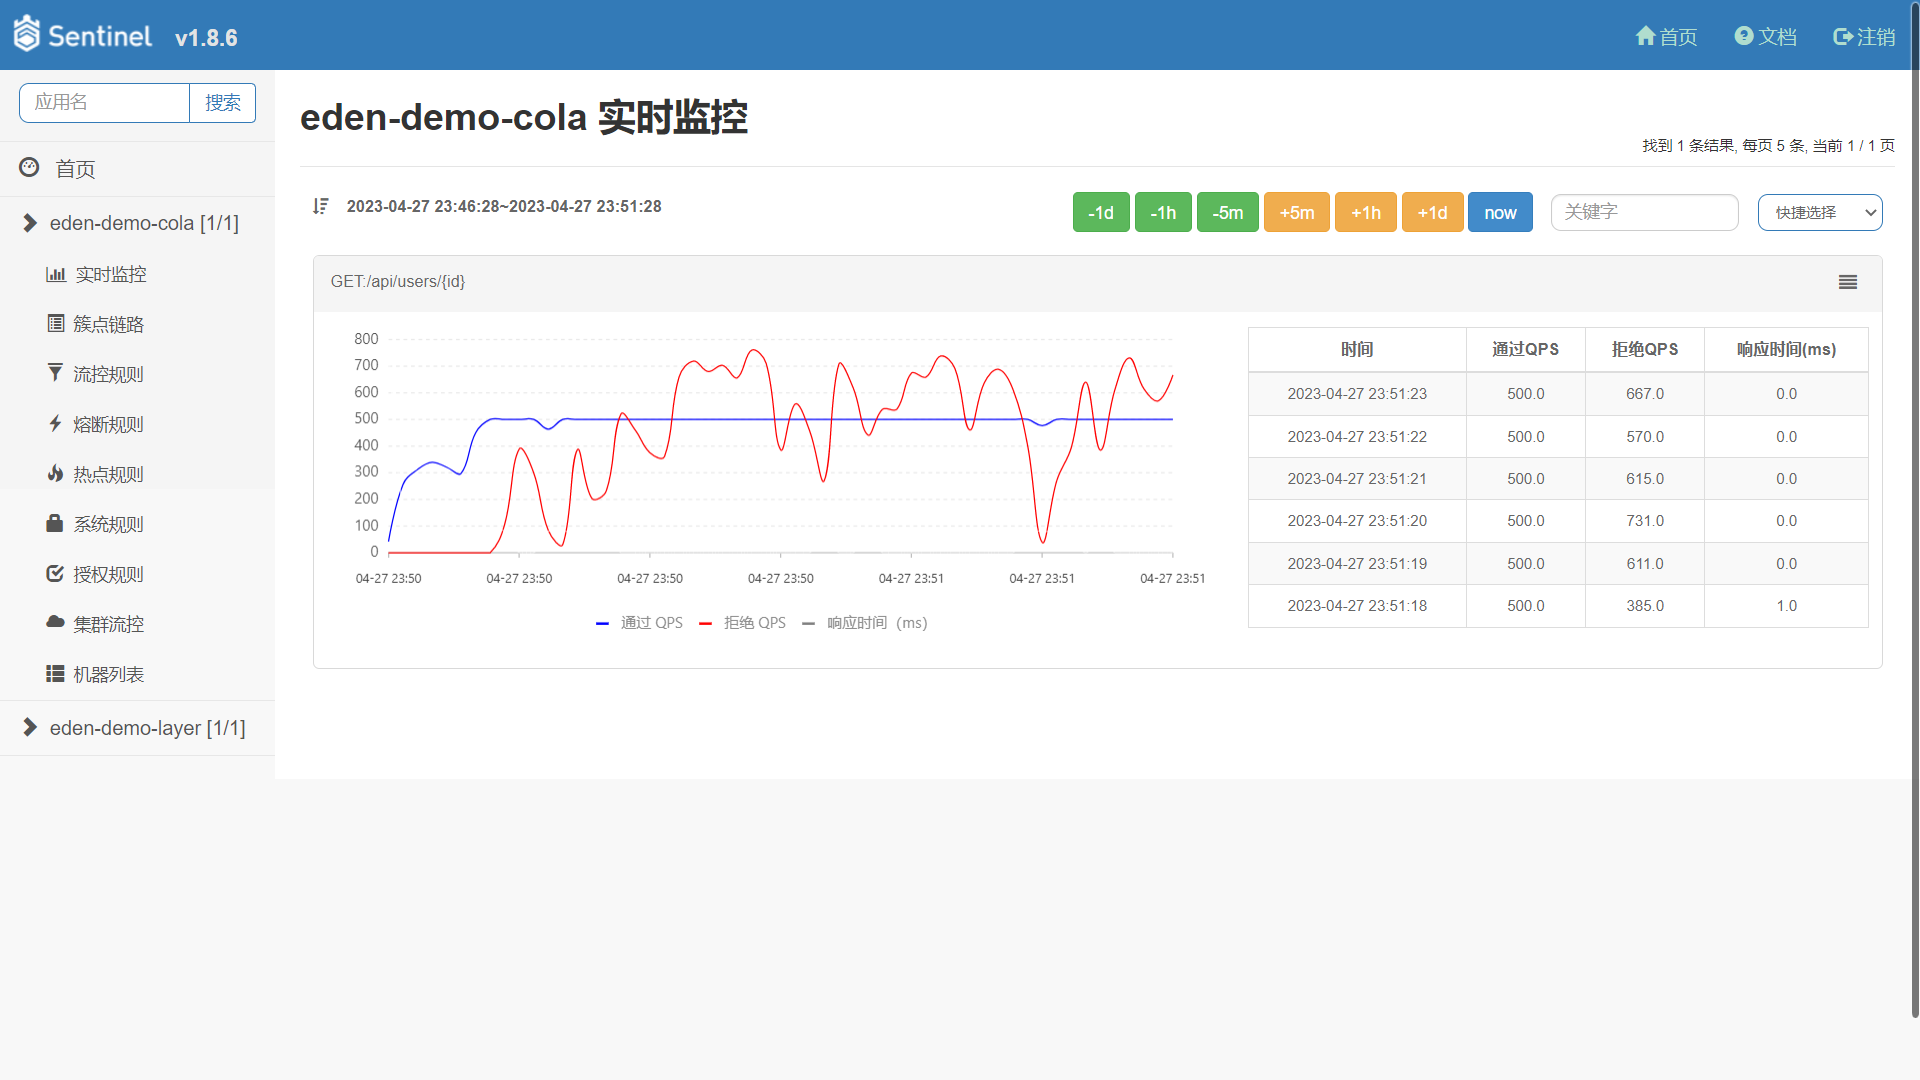
快捷时间选择
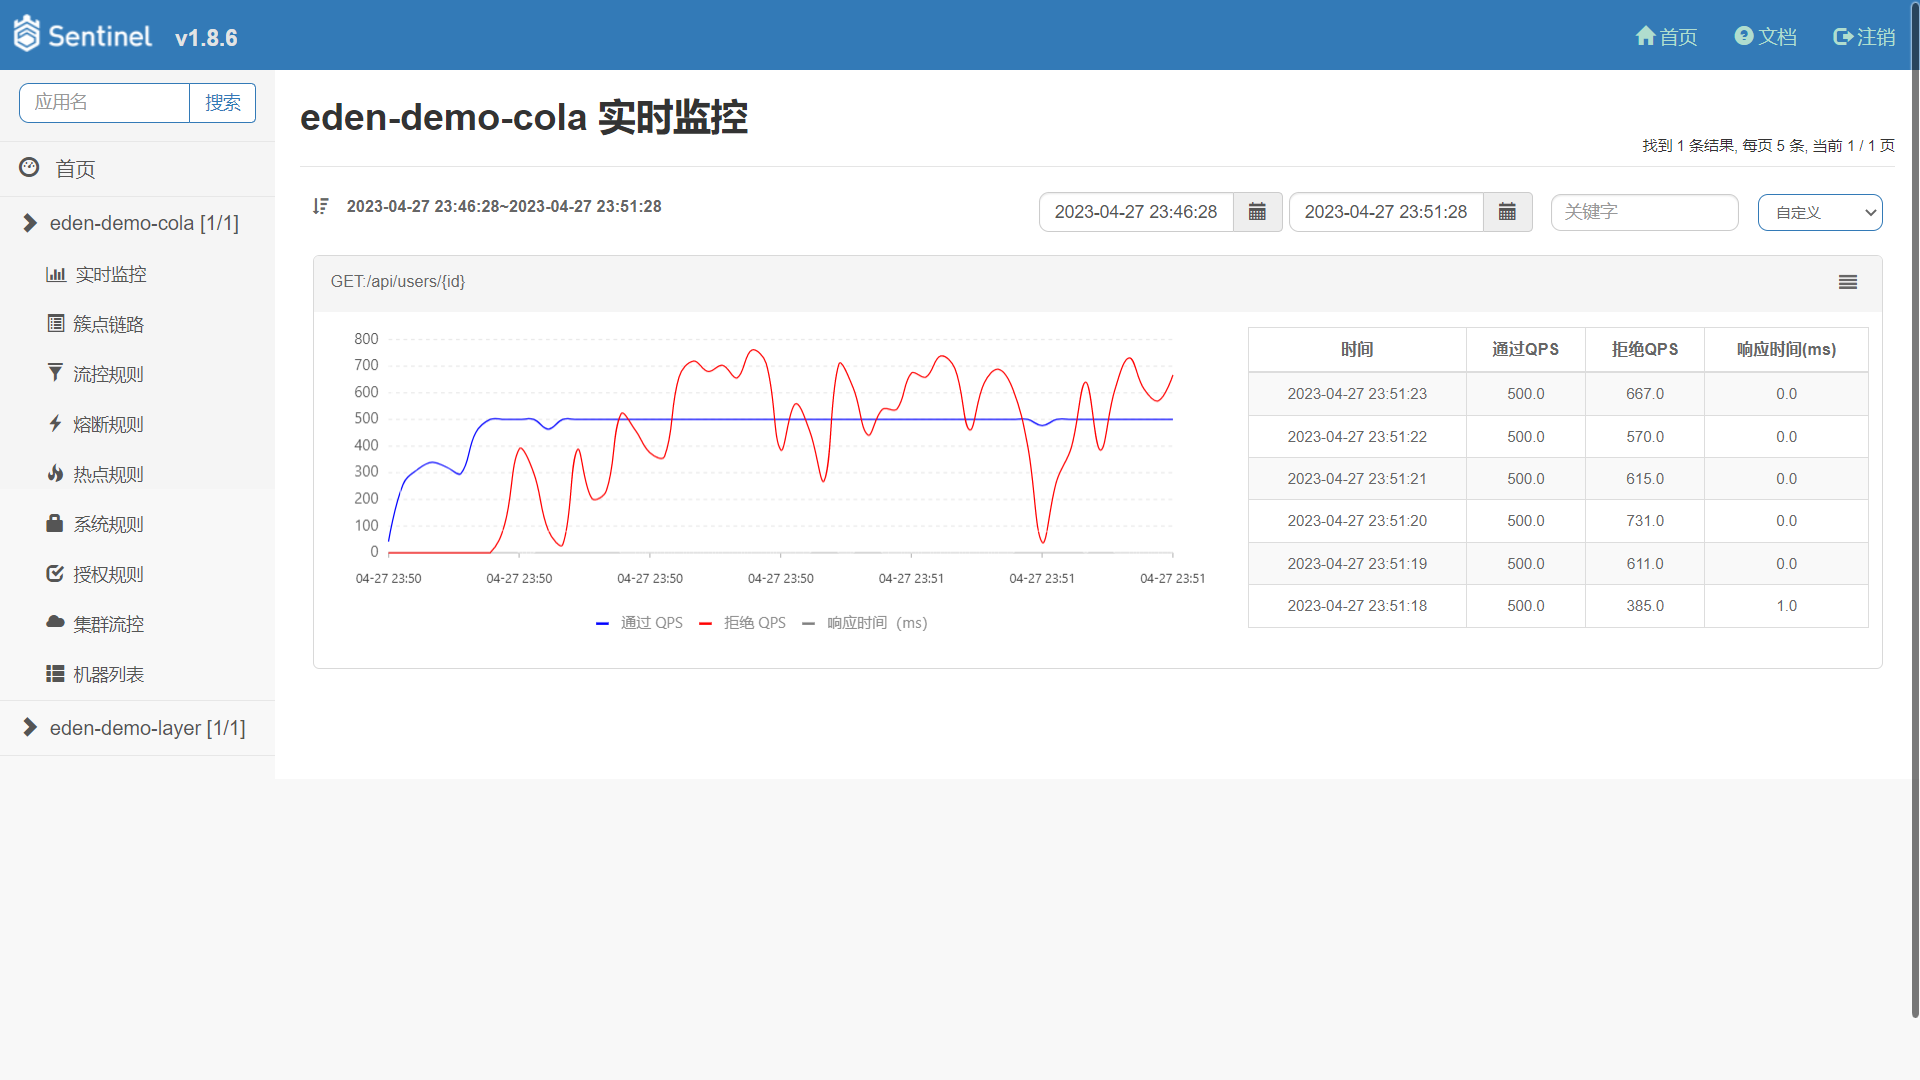
自定义时间选择
## 如何构建
本项目默认使用 Maven 来构建,最快的使用方式是 `git clone` 到本地。在项目的根目录执行 `mvn install -T 4C` 完成本项目的构建。
## 如何启动
### IDEA 启动
本项目默认不依赖外部组件,可以直接启动运行。
1. 在项目目录下运行 `mvn install`(如果不想运行测试,可以加上 `-DskipTests` 参数)。
2. 进入 `sentinel-dashboard` 目录,执行 `mvn spring-boot:run` 或者启动 `SentinelApplication` 类。运行成功的话,可以看到 `Spring Boot` 启动成功的界面。
在实际的生产需求,Sentinel 保存的规则和监控是需要持久化落盘的,因此,您可以在 `sentinel-dashboard/src/main/resources/application.properties` 接入外部组件。
* 规则存储类型:memory(默认)、nacos(推荐)、apollo、zookeeper
```properties
# 规则存储类型,可选项:memory(默认)、nacos(推荐)、apollo、zookeeper
sentinel.rule.type=nacos
# Nacos 存储规则,如果您设置了 sentinel.metrics.type=nacos,需要调整相关配置
sentinel.rule.nacos.server-addr=localhost:8848
sentinel.rule.nacos.namespace=demo
sentinel.rule.nacos.group-id=sentinel
sentinel.rule.nacos.username=nacos
sentinel.rule.nacos.password=nacos
# Apollo 存储规则,如果您设置了 sentinel.metrics.type=apollo,需要调整相关配置
sentinel.rule.apollo.portal-url=http://localhost:10034
sentinel.rule.apollo.token=
sentinel.rule.apollo.env=
# Zookeeper 存储规则,如果您设置了 sentinel.metrics.type=zookeeper,需要调整相关配置
sentinel.rule.zookeeper.connect-string=localhost:2181
sentinel.rule.zookeeper.root-path=/sentinel_rule
```
* 监控存储类型:memory(默认)、influxdb(推荐)、elasticsearch
```properties
# 监控存储类型,可选项:memory(默认)、influxdb(推荐)、elasticsearch
sentinel.metrics.type=memory
# InfluxDB 存储监控数据,如果您设置了 sentinel.metrics.type=influxdb,需要调整相关配置
influx.url=http://localhost:8086/
influx.token=UfgaW37A93PkncmJum25G7M2QkBg6xqqjGthh-o-UIVIynC_-Q7RFWlTtEpMqhGLCuAsX64k3Isc2uN33YgElw==
influx.org=sentinel
influx.bucket=sentinel
influx.log-level=NONE
influx.read-timeout=10s
influx.write-timeout=10s
influx.connect-timeout=10s
# Elasticsearch 存储监控数据,如果您设置了 sentinel.metrics.type=elasticsearch,需要调整相关配置
sentinel.metrics.elasticsearch.index-name=sentinel_metric
spring.elasticsearch.rest.uris=http://localhost:9200
spring.elasticsearch.rest.connection-timeout=3000
spring.elasticsearch.rest.read-timeout=5000
spring.elasticsearch.rest.username=
spring.elasticsearch.rest.password=
# 监控数据存储缓冲设置,降低底层存储组件写入压力。可选项:none(默认不启用)、kafka(推荐)
sentinel.metrics.sender.type=none
# Kafka 存储监控数据,如果您设置了 sentinel.metrics.sender.type=kafka,需要调整相关配置
sentinel.metrics.sender.kafka.topic=sentinel_metric
spring.kafka.producer.bootstrap-servers=localhost:9092
spring.kafka.producer.batch-size=4096
spring.kafka.producer.buffer-memory=40960
spring.kafka.producer.key-serializer=org.apache.kafka.common.serialization.StringSerializer
spring.kafka.producer.value-serializer=org.apache.kafka.common.serialization.StringSerializer
```
### 镜像启动
本项目已发布到 [Docker Hub](https://hub.docker.com/repository/docker/shiyindaxiaojie/sentinel-dashboard),请执行参考命令运行。
```bash
docker run -p 8090:8090 --name=sentinel-dashboard -d shiyindaxiaojie/sentinel-dashboard
```
## 如何部署
### FatJar 部署
执行 `mvn clean package` 打包成一个 fat jar,参考如下命令启动编译后的控制台。
```bash
java -Dserver.port=8080 \
-Dsentinel.rule.nacos.server-addr=localhost:8848 \
-Dsentinel.rule.nacos.namespace=demo \
-Dsentinel.rule.nacos.group-id=sentinel \
-Dsentinel.metrics.type=influxdb \
-Dinflux.url=http://localhost:8086 \
-Dinflux.token=XXXXXX \
-Dinflux.org=sentinel \
-Dinflux.bucket=sentinel \
-jar target/sentinel-dashboard.jar
```
### Docker 部署
调整 Maven 配置文件 `setiings.xml`,填写相关凭据。
````xml
github
${env.DOCKER_USERNAME}
${env.DOCKER_PASSWORD}
${env.DOCKER_IMAGE}
````
在项目根目录执行 `mvn -Pgithub -pl sentinel-dashboard jib:build -Djib.disableUpdateChecks=true` 打包为镜像。
### Helm 部署
进入 `helm` 目录,执行 `helm install -n sentinel-dashboard sentinel .` 安装,在 K8s 环境将自动创建 Sentinel 所需的资源文件。
## 如何接入
为了减少客户端集成的工作,您可以使用 [eden-architect](https://github.com/shiyindaxiaojie/eden-architect) 框架,只需要两步就可以完成 Sentinel 的集成。
1. 引入 Sentinel 依赖
````xml
io.github.shiyindaxiaojie
eden-sentinel-spring-cloud-starter
````
2. 开启 Sentinel 配置
````yaml
spring:
cloud:
sentinel: # 流量治理组件
enabled: false # 默认关闭,请按需开启
http-method-specify: true # 兼容 RESTful
eager: true # 立刻刷新到 Dashboard
transport:
dashboard: localhost:8090
datasource:
flow:
nacos:
server-addr: ${spring.cloud.nacos.config.server-addr}
namespace: ${spring.cloud.nacos.config.namespace}
groupId: sentinel
dataId: ${spring.application.name}-flow-rule
rule-type: flow
data-type: json
````
笔者提供了两种不同应用架构的示例,里面有集成 Sentinel 的示例。
* 面向领域模型的 **COLA 架构**,代码实例可以查看 [eden-demo-cola](https://github.com/shiyindaxiaojie/eden-demo-cola)
* 面向数据模型的 **分层架构**,代码实例请查看 [eden-demo-layer](https://github.com/shiyindaxiaojie/eden-demo-layer)
## 变更日志
请查阅 [CHANGELOG.md](https://github.com/shiyindaxiaojie/Sentinel/blob/1.8.x/CHANGELOG.md)
[license-apache2.0]:https://www.apache.org/licenses/LICENSE-2.0.html
[github-action]:https://github.com/shiyindaxiaojie/Sentinel/actions
[sonarcloud-dashboard]:https://sonarcloud.io/dashboard?id=shiyindaxiaojie_Sentinel
# Sentinel 流量治理平台
 [][license-apache2.0] [][github-action] [][sonarcloud-dashboard]
Sentinel 是阿里巴巴开源的流量治理平台,提供了 `流量控制`、`熔断降级`、`系统负载保护`、`黑白名单访问控制` 等功能。在实际的生产需求中,笔者进行了部分扩展:
1. 流控规则持久化:适配 `Apollo`、`Nacos`、`Zookeeper`
2. 监控数据持久化:适配 `InfluxDB`、`Kafka`、`Elasticsearch`
3. 监控面板优化:新增时间控件,允许在任意时刻内查询监控数据。
## 演示图例
### 改造前

### 改造后

快捷时间选择

自定义时间选择

## 如何构建
本项目默认使用 Maven 来构建,最快的使用方式是 `git clone` 到本地。在项目的根目录执行 `mvn install -T 4C` 完成本项目的构建。
## 如何启动
### IDEA 启动
本项目默认不依赖外部组件,可以直接启动运行。
1. 在项目目录下运行 `mvn install`(如果不想运行测试,可以加上 `-DskipTests` 参数)。
2. 进入 `sentinel-dashboard` 目录,执行 `mvn spring-boot:run` 或者启动 `SentinelApplication` 类。运行成功的话,可以看到 `Spring Boot` 启动成功的界面。
在实际的生产需求,Sentinel 保存的规则和监控是需要持久化落盘的,因此,您可以在 `sentinel-dashboard/src/main/resources/application.properties` 接入外部组件。
* 规则存储类型:memory(默认)、nacos(推荐)、apollo、zookeeper
```properties
# 规则存储类型,可选项:memory(默认)、nacos(推荐)、apollo、zookeeper
sentinel.rule.type=nacos
# Nacos 存储规则,如果您设置了 sentinel.metrics.type=nacos,需要调整相关配置
sentinel.rule.nacos.server-addr=localhost:8848
sentinel.rule.nacos.namespace=demo
sentinel.rule.nacos.group-id=sentinel
sentinel.rule.nacos.username=nacos
sentinel.rule.nacos.password=nacos
# Apollo 存储规则,如果您设置了 sentinel.metrics.type=apollo,需要调整相关配置
sentinel.rule.apollo.portal-url=http://localhost:10034
sentinel.rule.apollo.token=
sentinel.rule.apollo.env=
# Zookeeper 存储规则,如果您设置了 sentinel.metrics.type=zookeeper,需要调整相关配置
sentinel.rule.zookeeper.connect-string=localhost:2181
sentinel.rule.zookeeper.root-path=/sentinel_rule
```
* 监控存储类型:memory(默认)、influxdb(推荐)、elasticsearch
```properties
# 监控存储类型,可选项:memory(默认)、influxdb(推荐)、elasticsearch
sentinel.metrics.type=memory
# InfluxDB 存储监控数据,如果您设置了 sentinel.metrics.type=influxdb,需要调整相关配置
influx.url=http://localhost:8086/
influx.token=UfgaW37A93PkncmJum25G7M2QkBg6xqqjGthh-o-UIVIynC_-Q7RFWlTtEpMqhGLCuAsX64k3Isc2uN33YgElw==
influx.org=sentinel
influx.bucket=sentinel
influx.log-level=NONE
influx.read-timeout=10s
influx.write-timeout=10s
influx.connect-timeout=10s
# Elasticsearch 存储监控数据,如果您设置了 sentinel.metrics.type=elasticsearch,需要调整相关配置
sentinel.metrics.elasticsearch.index-name=sentinel_metric
spring.elasticsearch.rest.uris=http://localhost:9200
spring.elasticsearch.rest.connection-timeout=3000
spring.elasticsearch.rest.read-timeout=5000
spring.elasticsearch.rest.username=
spring.elasticsearch.rest.password=
# 监控数据存储缓冲设置,降低底层存储组件写入压力。可选项:none(默认不启用)、kafka(推荐)
sentinel.metrics.sender.type=none
# Kafka 存储监控数据,如果您设置了 sentinel.metrics.sender.type=kafka,需要调整相关配置
sentinel.metrics.sender.kafka.topic=sentinel_metric
spring.kafka.producer.bootstrap-servers=localhost:9092
spring.kafka.producer.batch-size=4096
spring.kafka.producer.buffer-memory=40960
spring.kafka.producer.key-serializer=org.apache.kafka.common.serialization.StringSerializer
spring.kafka.producer.value-serializer=org.apache.kafka.common.serialization.StringSerializer
```
### 镜像启动
本项目已发布到 [Docker Hub](https://hub.docker.com/repository/docker/shiyindaxiaojie/sentinel-dashboard),请执行参考命令运行。
```bash
docker run -p 8090:8090 --name=sentinel-dashboard -d shiyindaxiaojie/sentinel-dashboard
```
## 如何部署
### FatJar 部署
执行 `mvn clean package` 打包成一个 fat jar,参考如下命令启动编译后的控制台。
```bash
java -Dserver.port=8080 \
-Dsentinel.rule.nacos.server-addr=localhost:8848 \
-Dsentinel.rule.nacos.namespace=demo \
-Dsentinel.rule.nacos.group-id=sentinel \
-Dsentinel.metrics.type=influxdb \
-Dinflux.url=http://localhost:8086 \
-Dinflux.token=XXXXXX \
-Dinflux.org=sentinel \
-Dinflux.bucket=sentinel \
-jar target/sentinel-dashboard.jar
```
### Docker 部署
调整 Maven 配置文件 `setiings.xml`,填写相关凭据。
````xml
github
${env.DOCKER_USERNAME}
${env.DOCKER_PASSWORD}
${env.DOCKER_IMAGE}
````
在项目根目录执行 `mvn -Pgithub -pl sentinel-dashboard jib:build -Djib.disableUpdateChecks=true` 打包为镜像。
### Helm 部署
进入 `helm` 目录,执行 `helm install -n sentinel-dashboard sentinel .` 安装,在 K8s 环境将自动创建 Sentinel 所需的资源文件。
## 如何接入
为了减少客户端集成的工作,您可以使用 [eden-architect](https://github.com/shiyindaxiaojie/eden-architect) 框架,只需要两步就可以完成 Sentinel 的集成。
1. 引入 Sentinel 依赖
````xml
io.github.shiyindaxiaojie
eden-sentinel-spring-cloud-starter
````
2. 开启 Sentinel 配置
````yaml
spring:
cloud:
sentinel: # 流量治理组件
enabled: false # 默认关闭,请按需开启
http-method-specify: true # 兼容 RESTful
eager: true # 立刻刷新到 Dashboard
transport:
dashboard: localhost:8090
datasource:
flow:
nacos:
server-addr: ${spring.cloud.nacos.config.server-addr}
namespace: ${spring.cloud.nacos.config.namespace}
groupId: sentinel
dataId: ${spring.application.name}-flow-rule
rule-type: flow
data-type: json
````
笔者提供了两种不同应用架构的示例,里面有集成 Sentinel 的示例。
* 面向领域模型的 **COLA 架构**,代码实例可以查看 [eden-demo-cola](https://github.com/shiyindaxiaojie/eden-demo-cola)
* 面向数据模型的 **分层架构**,代码实例请查看 [eden-demo-layer](https://github.com/shiyindaxiaojie/eden-demo-layer)
## 变更日志
请查阅 [CHANGELOG.md](https://github.com/shiyindaxiaojie/Sentinel/blob/1.8.x/CHANGELOG.md)