# react_backend **Repository Path**: chaozwn/react_backend ## Basic Information - **Project Name**: react_backend - **Description**: react nextjs - **Primary Language**: Unknown - **License**: Not specified - **Default Branch**: main - **Homepage**: None - **GVP Project**: No ## Statistics - **Stars**: 0 - **Forks**: 0 - **Created**: 2023-04-23 - **Last Updated**: 2023-04-23 ## Categories & Tags **Categories**: Uncategorized **Tags**: None ## README # Fullstack Authentication Example with Next.js and NextAuth.js This example shows how to implement a **fullstack app in TypeScript with [Next.js](https://nextjs.org/)** using [React](https://reactjs.org/) (frontend), [Next.js API routes](https://nextjs.org/docs/api-routes/introduction) and [Prisma Client](https://www.prisma.io/docs/reference/tools-and-interfaces/prisma-client) (backend). It also demonstrates how to implement authentication using [NextAuth.js](https://next-auth.js.org/). The example uses an SQLite database file with some initial dummy data which you can find at [`./prisma/dev.db`](./prisma/dev.db). Note that the app uses a mix of server-side rendering with `getServerSideProps` (SSR) and static site generation with `getStaticProps` (SSG). When possible, SSG is used to make database queries already at build-time (e.g. when fetching the [public feed](./pages/index.tsx)). Sometimes, the user requesting data needs to be authenticated, so SSR is being used to render data dynamically on the server-side (e.g. when viewing a user's [drafts](./pages/drafts.tsx)). ## Getting started ### 1. Download example and install dependencies Download this example: ``` npx try-prisma@latest --template typescript/rest-nextjs-api-routes-auth ``` Install npm dependencies: ``` cd rest-nextjs-api-routes-auth npm install ```
Alternative: Clone the entire repo Clone this repository: ``` git clone git@github.com:prisma/prisma-examples.git --depth=1 ``` Install npm dependencies: ``` cd prisma-examples/typescript/rest-nextjs-api-routes-auth npm install ```
### 2. Create and seed the database Run the following command to create your SQLite database file. This also creates the `User` and `Post` tables that are defined in [`prisma/schema.prisma`](./prisma/schema.prisma): ``` npx prisma migrate dev --name init ``` When `npx prisma migrate dev` is executed against a newly created database, seeding is also triggered. The seed file in [`prisma/seed.ts`](./prisma/seed.ts) will be executed and your database will be populated with the sample data. ### 3. Configuring your authentication provider In order to get this example to work, you need to configure the [GitHub](https://next-auth.js.org/providers/github) and/or [Email](https://next-auth.js.org/providers/email) authentication providers from NextAuth.js. #### Configuring the GitHub authentication provider
Expand to learn how you can configure the GitHub authentication provider First, log into your [GitHub](https://github.com/) account. Then, navigate to [**Settings**](https://github.com/settings/profile), then open to [**Developer Settings**](https://github.com/settings/apps), then switch to [**OAuth Apps**](https://github.com/settings/developers). ![](https://res.cloudinary.com/practicaldev/image/fetch/s--fBiGBXbE--/c_limit%2Cf_auto%2Cfl_progressive%2Cq_auto%2Cw_880/https://i.imgur.com/4eQrMAs.png) 
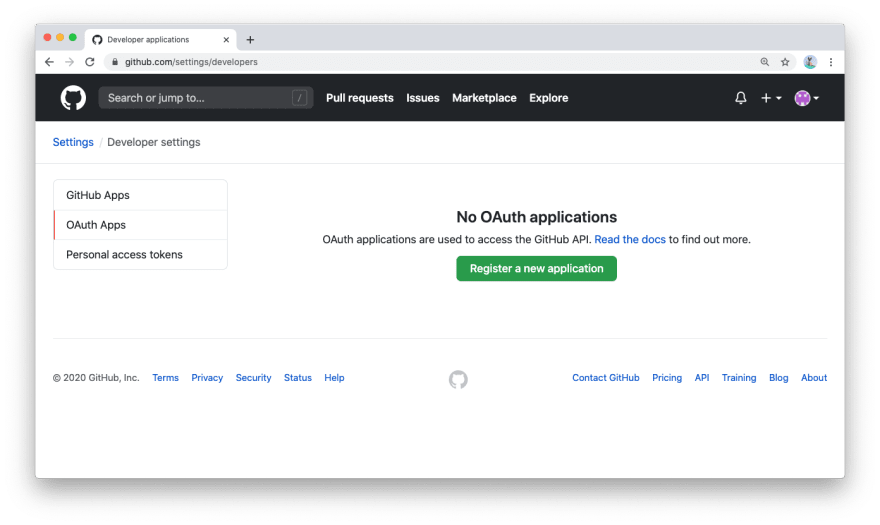
Clicking on the **Register a new application** button will redirect you to a registration form to fill out some information for your app. The **Authorization callback URL** should be the Next.js `/api/auth` route. An important thing to note here is that the **Authorization callback URL** field only supports a single URL, unlike e.g. Auth0, which allows you to add additional callback URLs separated with a comma. This means if you want to deploy your app later with a production URL, you will need to set up a new GitHub OAuth app. ![](https://res.cloudinary.com/practicaldev/image/fetch/s--v7s0OEs_--/c_limit%2Cf_auto%2Cfl_progressive%2Cq_auto%2Cw_880/https://i.imgur.com/tYtq5fd.png) Click on the **Register application** button, and then you will be able to find your newly generated **Client ID** and **Client Secret**. Copy and paste this info into the [`.env`](./env) file in the root directory. The resulting section in the `.env` file might look like this: ``` # GitHub oAuth GITHUB_ID=6bafeb321963449bdf51 GITHUB_SECRET=509298c32faa283f28679ad6de6f86b2472e1bff ```
#### Configuring the Email authentication provider You can [follow the instructions in the NextAuth.js documentation](https://next-auth.js.org/providers/email#configuration) to configure the Email authentication provider. Once your email authentication provider is configured, you can set the environment variables in [`.env`](./env) accordingly. ### 4. Start the app ``` npm run dev ``` The app is now running, navigate to [`http://localhost:3000/`](http://localhost:3000/) in your browser to explore its UI. ## Evolving the app Evolving the application typically requires three steps: 1. Migrate your database using Prisma Migrate 1. Update your server-side application code 1. Build new UI features in React For the following example scenario, assume you want to add a "profile" feature to the app where users can create a profile and write a short bio about themselves. ### 1. Migrate your database using Prisma Migrate The first step is to add a new table, e.g. called `Profile`, to the database. You can do this by adding a new model to your [Prisma schema file](./prisma/schema.prisma) file and then running a migration afterwards: ```diff // schema.prisma model Post { id Int @default(autoincrement()) @id title String content String? published Boolean @default(false) author User? @relation(fields: [authorId], references: [id]) authorId Int } model User { id Int @default(autoincrement()) @id name String? email String @unique posts Post[] + profile Profile? } +model Profile { + id Int @default(autoincrement()) @id + bio String? + userId Int @unique + user User @relation(fields: [userId], references: [id]) +} ``` Once you've updated your data model, you can execute the changes against your database with the following command: ``` npx prisma migrate dev ``` ### 2. Update your application code You can now use your `PrismaClient` instance to perform operations against the new `Profile` table. Here are some examples: #### Create a new profile for an existing user ```ts const profile = await prisma.profile.create({ data: { bio: "Hello World", user: { connect: { email: "alice@prisma.io" }, }, }, }); ``` #### Create a new user with a new profile ```ts const user = await prisma.user.create({ data: { email: "john@prisma.io", name: "John", profile: { create: { bio: "Hello World", }, }, }, }); ``` #### Update the profile of an existing user ```ts const userWithUpdatedProfile = await prisma.user.update({ where: { email: "alice@prisma.io" }, data: { profile: { update: { bio: "Hello Friends", }, }, }, }); ``` ### 3. Build new UI features in React Once you have added a new endpoint to the API (e.g. `/api/profile` with `/POST`, `/PUT` and `GET` operations), you can start building a new UI component in React. It could e.g. be called `profile.tsx` and would be located in the `pages` directory. In the application code, you can access the new endpoint via `fetch` operations and populate the UI with the data you receive from the API calls. ## Switch to another database (e.g. PostgreSQL, MySQL, SQL Server, MongoDB) If you want to try this example with another database than SQLite, you can adjust the the database connection in [`prisma/schema.prisma`](./prisma/schema.prisma) by reconfiguring the `datasource` block. Learn more about the different connection configurations in the [docs](https://www.prisma.io/docs/reference/database-reference/connection-urls).
Expand for an overview of example configurations with different databases ### PostgreSQL For PostgreSQL, the connection URL has the following structure: ```prisma datasource db { provider = "postgresql" url = "postgresql://USER:PASSWORD@HOST:PORT/DATABASE?schema=SCHEMA" } ``` Here is an example connection string with a local PostgreSQL database: ```prisma datasource db { provider = "postgresql" url = "postgresql://janedoe:mypassword@localhost:5432/notesapi?schema=public" } ``` ### MySQL For MySQL, the connection URL has the following structure: ```prisma datasource db { provider = "mysql" url = "mysql://USER:PASSWORD@HOST:PORT/DATABASE" } ``` Here is an example connection string with a local MySQL database: ```prisma datasource db { provider = "mysql" url = "mysql://janedoe:mypassword@localhost:3306/notesapi" } ``` ### Microsoft SQL Server Here is an example connection string with a local Microsoft SQL Server database: ```prisma datasource db { provider = "sqlserver" url = "sqlserver://localhost:1433;initial catalog=sample;user=sa;password=mypassword;" } ``` ### MongoDB Here is an example connection string with a local MongoDB database: ```prisma datasource db { provider = "mongodb" url = "mongodb://USERNAME:PASSWORD@HOST/DATABASE?authSource=admin&retryWrites=true&w=majority" } ```
## Next steps - Check out the [Prisma docs](https://www.prisma.io/docs) - Share your feedback in the [`#product-wishlist`](https://prisma.slack.com/messages/CKQTGR6T0/) channel on the [Prisma Slack](https://slack.prisma.io/) - Create issues and ask questions on [GitHub](https://github.com/prisma/prisma/) - Watch our biweekly "What's new in Prisma" livestreams on [Youtube](https://www.youtube.com/channel/UCptAHlN1gdwD89tFM3ENb6w)